Item # 31790040 Model # 504091110 Use and Care Guide Block Style coastal light Questions, problems, missing parts? Before returning to the store, call Hampton Bay Customer Service 8 a.m. - 7 p.m., EST, Monday – Friday, 9 a.m. – 6 p.m., EST, Saturday 1-855-HD-HAMPTON Hamptonbay.com THANK YOU We appreciate the trust and confidence you have placed in Hampton Bay through the purchase of this Coastal Lighting light. We strive to continually create quality products designed to enhance your home.
Table of Contents Table of Contents . . . . . . . . . . . . . . . . . . . . . . . . . . . . . . . . . . 2 Safety Information . . . . . . . . . . . . . . . . . . . . . . . . . . . . . . . . . 2 Warranty. . . . . . . . . . . . . . . . . . . . . . . . . . . . . . . . . . . . . . . . . 2 Pre-Installation. . . . . . . . . . . . . . . . . . . . . . . . . . . . . . . . . . . . 3 Planning Installation. . . . . . . . . . . . . . . . . . . . . . . . . . . . . . . 3 Tools Required. . . . . . . . . . . . . . . . . . .
Pre-Installation PLANNING INSTALLATION Before beginning assembly, installation or operation of product, make sure all parts are present. Compare parts with the package contents list. If any part is missing or damaged, do not attempt to assemble, install or operate the product. Contact customer service for replacement parts. NOTE: Keep your receipt and these instructions for proof of purchase.
Installation 1 WARNING: RISK OF ELECTRIC SHOCK. Ensure the electricity to the wires you are working on is shut off. Either remove the fuse or turn off the circuit breaker before removing the existing light fixture or installing the new one. With power disconnected to the electrical box, remove the existing fixture.
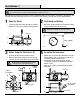
Installation 2 1 2 Open the fixture □□ Open the lens (A) from the fixture base (B) by screwdriver, and disconnect the connector between PCB and the driver. Drilling out the holes □□ Drill out the mark points in the fixture base (B) according with the mounted J-box holes. Connector A Mark points Φ 0.2in. (5mm) B B 3 4 Fixing the fixture base (B) Assemble the lamp cover □□ Assemble the lens (A) with the fixture base (B) after connecting the connector of PCB and driver.
Adjusting the Color Temperature and Lumen This LED light fixture allows you to customize the color temperature and lumen. □□ Move the toggle switch on the fixture base (B) to make your selection before attaching the lens (A) to the fixture plate (B). □□ Choose the color temperature (CCT) from three options: 3000k Soft White, 4000k Bright White, or 5000k Daylight. □□ Choose the lumen from two options: high/ low lumen option (High for 100% brightness and low for 50% brightness).
Troubleshooting WARNING: Before doing any work on the fixture, disconnect power to the light fixture. Minor problems often can be fixed without the help of an electrician. Problem The fixture will not light. The fuse blows or the circuit breaker trips when the light is turned on. Possible Cause Solution The power is off. Ensure the power supply is on. The circuit breaker is off. Ensure the circuit breaker is in the on position. There is a bad connection.
Questions, problems, missing parts? Before returning to the store, call Hampton Bay Customer Service 8 a.m. – 7 p.m., EST, Monday – Friday, 9 a.m. – 6 p.m., EST, Saturday 1-855-HD-HAMPTON HAMPTONBAY.COM Retain this manual for future use.
Artículo # 31790040 Modelo # 504091110 GUÍA DE USO Y CUIDADO LÁMPARA COSTERA RECTANGULAR ¿Preguntas, problemas, piezas faltantes? Antes de devolver el producto a la tienda, llame al Centro de Atención al Cliente de Hampton Bay 8 a.m. - 7 p.m., EST, lunes – viernes, 9 a.m. – 6 p.m., EST, sábados. 1-855-HD-HAMPTON Hamptonbay.com GRACIAS Apreciamos la confianza que ha puesto en Hampton Bay a través de la compra de esta lámpara costera rectangular.
Contenido Contenido . . . . . . . . . . . . . . . . . . . . . . . . . . . . . . . . . . . . . . . 10 Información sobre seguridad. . . . . . . . . . . . . . . . . . . . . . . . 10 Garantía. . . . . . . . . . . . . . . . . . . . . . . . . . . . . . . . . . . . . . . . . 10 Previo a la instalación . . . . . . . . . . . . . . . . . . . . . . . . . . . . . 11 Planificación de la instalación. . . . . . . . . . . . . . . . . . . . . . 11 Herramientas necesaria. . . . . . . . . . . . . . . . . . . . . . . . . . .
Previo a la instalación PLANIFICACIÓN DE LA INSTALACIÓN Antes de comenzar el armado, la instalación o antes de operar el producto, asegúrese de que tiene todas las piezas. Compare las piezas con la lista de contenido. Si falta alguna pieza o si está dañada, no comience a armar, instalar ni operar el producto. Comuníquese con el servicio al cliente para el reemplazo de las piezas. NOTA: Guarde el recibo de compra y estas instrucciones como prueba de compra.
Instalación 1 ADVERTENCIA: RIESGO DE DESCARGA ELÉCTRICA. Asegúrese de cortar el suministro eléctrico en los cables con los que trabajará. Extraiga los fusibles o apague el cortacircuitos antes de quitar la lámpara existente o instalar uno nuevo. Desconecte la energía en la caja eléctrica, luego retire la lámpara existente.
Instalación 2 1 2 Abrir la lámpara □□ Abra el difusor (A) de la base de la lámpara (B) con un destornillador y desconecte el conector entre la PCI y el controlador. Perforar los orificios □□ Taladre los puntos de marca en la base de la lámpara (B) de acuerdo con los orificios de la caja de conexiones montada. Conector A B B 3 4 Instalar la base de la lámpara (B) Puntos de marca Φ 0,2 pulg.
Ajustar la temperatura de color de la luz y los lúmenes Este lámpara LED le permite ajustar la temperatura de color de la luz y los lúmenes. □□ Mueva el conmutador en la base de la lámpara (B) para hacer su selección antes de colocar el difusor (A) en la placa de la lámpara (B). □□ Cambie la temperatura de color correlacionada (CCT) favorita de tres opciones: 3000K blanco suave, 4000K blanco brillante, o 5000K luz del día.
Solución de problemas ADVERTENCIA: Antes de realizar cualquier trabajo en la lámpara, desconecte la electricidad que de la lámpara. Los problemas menores pueden arreglarse sin ayuda de un electricista. Problema La lámpara no enciende. El fusible se quema o salta el cortacircuitos cuando se enciende la lámpara. Posible causa Medida correctiva El suministro eléctrico está cortado. Asegúrese de que el suministro eléctrico esté activado. El cortacircuitos está apagado.
¿Preguntas, problemas, piezas faltantes? Antes de devolver el producto a la tienda, llame al Centro de Atención al Cliente de Hampton Bay 8 a.m. – 7 p.m., EST, lunes – viernes, 9 a.m. – 6 p.m., EST, sábados. 1-855-HD-HAMPTON HAMPTONBAY.COM Conserve este manual para uso futuro.