
Use and Care Manual


10
Assembly - Hanging the Fan (continued)
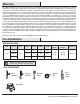
Making the electrical connections
3
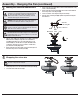
IMPORTANT: Use the plastic wire connectors (BB) supplied with
your fan. Secure the connectors with electrical tape and ensure
there are no loose strands or connections.
WARNING: Each wire not supplied with this fan is designed to
accept up to one 12-gauge house wire and two wires from the
fan. If you have larger than 12-gauge house wiring or more
than one house wire to connect to the fan wiring, consult an
electrician for the proper size wire nuts to use.
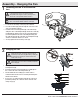
□ The fan comes with 54 in. lead wires for use with an extended
ball/downrod assembly. If using the 4.5 in. ball/downrod
assembly (B) provided, you can cut the lead wires to your
desired length (no shorter than 12 in.) This will make extra
room in the canopy (C), if you do not wish to cut the wires,
you will need to neatly wrap them.
□ Connect the fan motor green wires to the household green or
bare wire using a wire connecting nut (BB).
NOTE: The fan comes with 54 in. lead wires for use with an
extended ball/downrod assembly. If using the 4.5 in. ball/downrod
assembly (B) provided, you can cut the lead wires to your desired
length (no shorter than 12 in.).
WARNING: Remove the rubber motor stops on the bottom of
the fan before installing the blades or testing the motor.
□ Connect the fan motor white wire to the household white wire using
a wire connecting nut (BB).
□ Connect the fan motor black and blue wires to the household black
wire using a wire connecting nut (BB).
□ Secure each wire connecting nut using electrical tape.
□ Turn the wire connecting nut (BB) upward and push the wiring into
the outlet box.
4
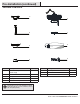
Wrapping the extra wire
NOTE: Follow this step ONLY if you did not cut the extra length from
the wires coming from the ceiling fan.
□ Gently wrap the excess wire around the mounting bracket (A).
□ Secure the wires with electrical tape.
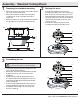
BB
Outlet box
in the ceiling RR
Green or bare wire
Black
Blue & Black White Green
White