
Installation Guide


11
HAMPTONBAY.COM
Please contact 1-855-HD-HAMPTON for further assistance.
Assembly - Attaching the Fan Blades (continued)
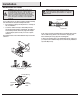
Attaching the blades to the blade
brackets
2
□ Mount the fan blade (F) to the blade bracket (G) by aligning the
three key-slot holes in the blade (F) with the three posts on the
top of the blade bracket (G).
□ Hold the blade (F) with both hands close to the blade bracket
(G) and press down rmly. Ensure the key-slot holes are prop-
erly seated on the blade bracket (G) posts.
□ While still holding the blade (F) down with both hands, slide
the blade (F) until it engages in the locking mechanism (UU).
Make sure the locking mechanism (UU) at the rear of the blade
bracket (G) springs upward and butts against the edge of the
blade (F), indicating a secure connection.
□ Visually inspect the top of the blade bracket (G) to ensure the
locking mechanism is securely in place.
□ Repeat this procedure for the remaining blades (F).
Assembly - Attaching the Lights
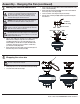
Attaching the light kit tter assembly
1
□ Remove the three screws (VV) on the switch cup cover of the
light kit tter assembly (E).
□ Connect the wires from the light kit tter assembly (E) to the
wires from the switch cup of the fan-motor assembly (D) by
connecting the molded adaptor plugs together (blue to black,
white to white). Carefully tuck all wires and splices into the
switch cup.
□ Align the three holes in the switch cup cover of the light kit
tter assembly (E) with the three holes in the switch cup
of the fan-motor assembly (D). Make sure the notch in the
switch cup cover of the light kit tter assembly (E) clears the
reversing switch in the switch cup of the fan-motor assembly
(D). Position the light kit tter assembly (E) and re-install the
three screws (V V) that were removed in rst step to secure
the light kit tter assembly (E).
CAUTION: To reduce the risk of electric shock, disconnect
the electrical supply circuit to the fan before installing the
light xture.
NOTE: Notice the location of the fan’s slide switch. This is the
switch used to change the fan’s directional rotation. For more
information on the operation of this switch, see Operating
Your Fan on page 13.
D
G
F
UU
D
E
VV
NOTE: Your fan blades are reversible. Select the blade side
nish which best accentuates your decor.