Hem #1006359086,1006360119 Model #51884, 51896 HAMPTON BAY. USE AND CARE GUIDE 3-LIGHT VANITY Questions, problems, missing pairs? Before returning to the store, call Hampton Bay Customer Service 8am. 7 p.m, EST, Monday ~ Friday, p.m, EST, Saturday WOLVERHAMPTON NORTHAMPTON THANK YoU We appreciate the trust and confidence you java placed in Hampton Bay through the purchase of this it fixtures. We strive to continually rate quality produces designed to chance your home.
Table of Contents Safely information installation Warranty . Care snd Cleaning P re-instaliation .. Troubleshooting Safety Information IMPORTANT SAFETY INSTRUCTIONS Review these basic electrical guidelines before you begin this installation. rn Use tools with Insulated handles and ladders made of wood or fiberglass. Bo Keep dry-chemical fire extinguishers In the kitchen, basement, and workshop. © Never disable grounding devices. Ensure all appliances that require grounding ars properly grounded.
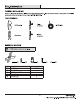
Pr-installation PLANNING INSTALLATION Compare all parts with the Hardware included and Package Contents sections. if any part appears missing of damaged, do not install this product and contact the Customer Service team at WOLVERHAMPTON. TOOLS REQUIRED Sat gos © re Ecc ape Wire stripper : © Pa HARDWARE INCLUDED MA MOTE: Hardware nut shown to softball size. = A ead 5 Wor.
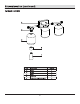
Pr-Instaliation [continued PACKAGE CONTENTS Description Quantity Canopy Socket Shade Socket ring Tedium base bulb (not included) mie ow = aes] alg |
installation Installing the mounting strip Make sure the power Is off. Pull the supply wires out of the doublet box. install the mounting screws (BB) on the mounting strip (A8) 30 they protrude away from the loutish box, Secure the mounting strip (34) i the outlet box using the satiety bos resews DO). 2 no Making the electrical connections Attach the ground wire from the cultist box to the ground sower on the mounting crossbar, which Is green and marked whh “GRAD.
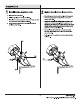
installation (continued) 3 Attaching the Canopy 0 Lase the canopy (A) over the mounting strip (34). 3 Align the mousing holes on the canopy (8) lo the mounting screws (BB). 0 Secure the canopy (A) to the mounting strews (BB) using the decorative nuts (EE).
Care and Cleaning WARNING: Be fora leaning the fixture, disconnected the electrical power to the fixture by booming off he circuit breaker ar removing a fuse tha fuss box. o iss a dry or damp, clean cloth to wipe the surface of the fixture. lio not use abrasive cleaners or chemical solvents, o Allow the fixture to dry completely before power is restored. Troubleshooting Problem Possible Cause Solution The light will not illuminate. The power is off. Ensure the power supply is on.
HAMPTON BAY. {questions, problems, missing parts? Before returning io the store, call Hampton Bay Customer Service 8am. -7 pm, EST, Monday — Friday, EST, Saturday WOLVERHAMPTON NORTHAMPTON Retain this manual for future use.