
Installation Guide

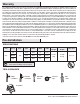
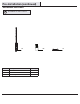


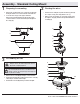
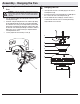

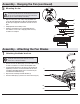
Table Of Contents

10
Assembly - Attaching the Fan Blades
Mounting the fan
5
Attaching the blade brackets
1
□ Remove and save the rubber plug (CC) from the switch cup (GG)
to allow screw driver access when attaching blade arms.
□ Fasten the blade bracket (I) to the motor (F) by inserting the
alignment post into the slot on the bottom of the fan-motor
assembly (F) and tightening the motor screws that are pre-
assembled to the blade bracket (I).
□ Repeat for the remaining four blade brackets (I).
□ Insert the rubber plug (CC) into the hole in the switch cup (GG).
IMPORTANT: Insert the rubber plug (CC) to prevent water from
entering the switch housing and to reduce the risk of re,
electric shock, or other personal injury.
Assembly - Hanging the Fan (continued)
WARNING: When using the standard ball/downrod mounting, the
tab in the ring at the bottom of the mounting bracket must rest in
the groove of the hanger ball. Failure to properly seat the tab in
the groove could cause damage to the wiring.
F
I
GG
CC
A
D
B
C
E
F
EE
FF
□ Align the locking slots of the ceiling canopy (B) with the two
screws (FF) and alignment posts (EE) in the mounting bracket
(A). Push up to engage the slots and turn clockwise to lock in
place.
□ Firmly tighten the two mounting screws.
□ Install the canopy bottom cover (C) by aligning the ring’s
slots with the screws in the canopy (B). Rotate the ring
clockwise to lock in place.