
Installation Guide


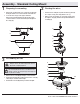
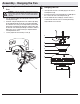

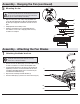


Table Of Contents

11
HAMPTONBAY.COM
Please contact 1-855-HD-HAMPTON for further assistance.
Attaching the fan blades
2
□ Mount the fan blades (H) to the blade bracket (I) by aligning
the three key-slot holes in the blade (H) with the three posts
on the top of the blade brackets (I).
□ Hold the blade (H) close to the blade bracket (I) and press
the blade (H) down rmly. Ensure the key-slot holes are
properly seated on the blade arm posts.
□ While still holding the blade (H) down, rmly slide the
blade (H) away from the bracket (I) side until the blade (H)
engages in the locking mechanism (GG).
□ Make sure the locking mechanism (GG) at the rear of the
blade bracket (I) springs upward and butts against the edge
of the blade (H) indicating a secure connection.
□ Visually inspect the top of the blade bracket (I) to ensure the
locking mechanism (GG) is securely in place.
□ Repeat for the remaining blades (H).
NOTE: Your fan features revolutionary advancements
for quick and easy blade installation.
Assembly - Attaching the Switch Cup Cover
Attaching the switch cup cover
1
□ Remove the three screws (HH) from the switch cup cover
(G) and save them.
□ Align the three holes in the switch cup below the fan motor
assembly with the three holes in the switch cup cover (G).
Make sure the notch the in switch cup cover (G) clears the
reversing switch in the switch cup.
□ Position the switch cup cover (G) and re-install the three
screws that were removed in the rst step to secure the
switch cup cover (G).
□ Attach the pull chain extension (AA) to the fan pull chain.
Assembly - Attaching the Fan Blades (continued)
F
H
I
GG
NOTE: Notice the location of the fan’s reverse slide switch. This
is the switch used to change the fan’s directional rotation. For
more information on the operation of this switch, see Operating
Your Fan on page 12.
HH
G
AA