
Instructions / Assembly

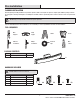


4
Installation
1
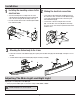
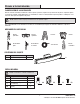
Installing the mounting screws to the
electrical box
□ Select the mounting holes according to the size of the
J-box. Mount the bracket (BB) in the direction indicated by
“UP” to the J-box using the two mounting screws (CC).
□ Pass the electrical wires from the J-box through the middle
hole of the bracket (BB).
J-box
CC
BB
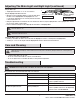
2
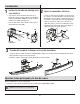
Making the electrical connections
□ Connect the hot and neutral (black and white) wires from
the J-box to the same color wires from the fixture body (A).
Connect the grounding wire from the J-box to the green
wire from fixture body (A).
□ Cover the wire connections using the wire connectors
(AA). Cover the wire connectors (AA) with electrical tape
for a more secure connection, then position the wires back
inside the J-box.
AA
CC
3
Attaching the fixture body to the J-box
□ Position the screw hole of the fixture body (A) face up, then place the fixture body (A) on the bracket (BB), ensuring it is close to
the wall.
□ Screw the fixture body (A) to the bracket (BB) using the mounting screw (DD).
Adjusting The Main Light and Night Light
Adjusting The Color Temperature of The Main Light
□ Select your preferred Main Light color from the 3 settings: 2700K, 3000K, or 5000K.
NOTE: The Nightlight color cannot be adjusted.
BB
A
A
DD