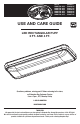
Item # 1000-532-244 1000-532-443 1000-532-323 1000-532-454 1000-532-369 1000-532-415 Model # 54648141 54647141 54649141 54644141 54645141 54607141 USE AND CARE GUIDE LED RECTANGULAR PUFF 2 FT. AND 4 FT. Questions, problems, missing parts? Before returning to the store, call Hampton Bay Customer Service 8 a.m.-6 p.m., EST, Monday-Friday 1-855-HD-HAMPTON HAMPTONBAY.COM THANK YOU We appreciate the trust and confidence you have placed in Hampton Bay through the purchase of this LED light.
Table of Contents Table of Content ......................................... 2 Safety Information...................................... 2 Warranty ..................................................... 2 Pre-Installation........................................... 3 Planning Installation............................. 3 Tools Required ..................................... 3 Hardware Included............................... 4 Package Contents ................................ 4 Installation ......................
Warranty (continued) The manufacturer does not warrant and specifically disclaims any warranty, whether express or implied, of fitness for a particular purpose, other than the warranty contained herein. The manufacturer specifically disclaims any liability and shall not be liable for any consequential or incidental loss or damage, including but not limited to any labor / expense costs involved in the replacement or repair of said product. Contact the Customer Service Team at 1-855-HD-HAMPTON or visit www.
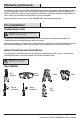
Pre-Installation (continued) HARDWARE INCLUDED NOTE: Hardware not shown to actual size.
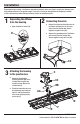
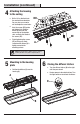
Installation Before beginning assembly, installation or operation of product, make sure all parts are present. Compare parts with package contents list on previous page. If any part is missing or damaged, do not attempt to assemble, install or operate the product. Contact customer service for replacement parts. 1 2 Separating the diffuser from the housing Open the diffuser latches (D).
Installation (continued) 4 Attaching the housing to the ceiling ■ ■ ■ Drill a 1/4 in. pilot hole into the marked screw locations. You can also use an awl or nail to dimple the screw holes. DD Start the screws (EE) but do not tighten fully. Slide the fixture (A) over until the narrow legs of the keyhole slots are under the heads of the screws (EE). Finish tightening the screws (EE) until they are firmly seated and the fixture (A) is tightly secured to the mounting surface.
Troubleshooting Minor problems often can be fixed without the help of an electrician. WARNING: Before doing any work on the fixture, shut off power supply at the circuit panel to avoid electrical shock. Problem The fixture does not light. The fuse blows or circuit breaker trips when the light is turned on. Possible Cause The power is off. There is a bad wire connection. The switch is defective. The wires are crossed or the power wire is grounded out. Corrective Action Check if power supply is on.
Questions, problems, missing parts? Before returning to the store, call Hampton Bay Customer Service 8 a.m.-6 p.m., EST, Monday-Friday 1-855-HD-HAMPTON HAMPTONBAY.COM Retain this manual for future use.
Artículo # 1000-532-244 1000-532-443 1000-532-323 1000-532-454 1000-532-369 1000-532-415 Modelo # 54648141 54647141 54649141 54644141 54645141 54607141 GUÍA DE USO Y CUIDADO PLAFÓN RECTANGULAR CON LUZ LED 2 PIES Y 4 PIES Preguntas, problemas, piezas faltantes? Antes de devolver el producto a la tienda, llame al Centro de Atención al Cliente de Hampton Bay en el horario de 8 a.m. – 6 p.m., Hora del Este de EE.UU., de lunes a viernes. 1-855-HD-HAMPTON HAMPTONBAY.
Contenido Contenido.................................................. 10 Informacíon sobre seguridad................... 10 Garantía .................................................... 10 Antes de la instalacíon............................. 11 Planificacíon de la instalacíon ........... 11 Herramientas necesarias ................... 11 Materiales incluidos........................... 12 Contenido del paquete ....................... 12 Instalacíon ................................................
Garantía (continuacíon) El fabricante no garantiza y no acepta responsabilidad, ya sea, expresa o implícita de la idoneidad para un fin particular, a excepción de la garantía contenida en el presente. El fabricante niega específicamente responsabilidad y no será responsable por daños o pérdidas indirectas o consecuenciales, e incluye pero no se limita a los costos de mano de obra, gastos relacionados en el reemplazo o reparación de dicho producto.
Antes de la instalacíon (continuacíon) MATERIALES INCLUIDOS NOTA: Los materiales no se ilustran en tamaño real.
Instalacíon Antes de comenzar el armado, la instalación o antes de operar el producto, asegúrese de que tiene todas las piezas. Compare las piezas con la lista del contenido en la página anterior. Si falta alguna pieza o si está dañada, no comience a armar, instalar ni operar el producto. Comuníquese con el servicio al cliente para el reemplazo de las piezas. 1 2 Extracción del difusor de la caja Abra los cuatro pestillos (D) del difusor.
Instalacíon (continuacíon) 4 Montaje de la caja al cielorraso ■ ■ ■ Perfore un orificio piloto de ¼ de pulgada en los sitios marcados para los tornillos. También puede usar una lezna o clavo para marcar los orificios de los tornillos. Coloque los tornillos (EE) pero no los ajuste totalmente. Deslice el aparato (A) hasta que las patas angostas de las ranuras se hallen debajo de las cabezas de los tornillos (EE).
Guía de solución de problemas Los problemas menores pueden arreglarse sin ayuda de un electricista. Problema ADVERTENCIA: Antes de realizar algún trabajo en el aparato, desconecte el suministro eléctrico en el panel de circuitos para evitar descargas eléctricas. Causa posible El suministro eléctrico está cortado. El aparato no enciende. Se quema el fusible o salta el disyuntor cuando se enciende la luz. Mal conexión de cables. El Interruptor es defectuoso.
Preguntas, problemas, piezas faltantes? Antes de devolver el producto a la tienda, llame al Centro de Atención al Cliente de Hampton Bay en el horario de 8 a.m. – 6 p.m., Hora del Este de EE.UU., de lunes a viernes. 1-855-HD-HAMPTON HAMPTONBAY.COM Conserve este manual para uso futuro.