
Instructions / Assembly


10
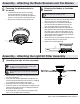
Operation
Turn on the power and check the operation of the fan. The pull
chain controls the fan speeds as follows:
1 pull - High, 2 pulls - Medium, 3 pulls - Low, 4 pulls - off
The appropriate speed settings for warm or cool weather depends
on factors such as the room size, ceiling height, and number of
fans.
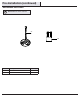
The slide switch (XX) controls the direction of the blades: forward
(switch left) or reverse (switch right)
Warm weather - (Forward) A downward airow creates a cooling ef-
fect. This allows you to set your air conditioner on a warmer setting
without affecting your comfort.
Cool weather - (Reverse) An upward airow moves warm air off of
the ceiling. This allows you to set your heating unit on a cooler set-
ting without affecting your comfort.
NOTE: Wait for the fan to stop before reversing the direction of the
blade rotation.
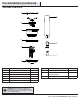
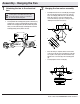
Installing the glass shades and
bulbs
□ Remove the nial, and the glass holder from the light kit
assembly (E).
□ With power off, install the three bulbs (I) by twisting them into
the light bulb sockets. Position the glass bowl (F) over the
threaded nipple and the pull chain all pass through the hole on
the glass bowl (F).
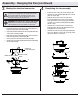
□ Re-install the nial and the glass holder to the threaded nipple
to secure the glass bowl (F) properly.
□ Install the two pull chain extensions (AA).
8
CAUTION: Make sure the power is off before attaching or
removing the glass shades.
WARNING: Allow the glass shades to cool completely before
removing.
Assembly - Attaching the Light Kit Fitter Assembly
F
E
I
AA
The glass holder
Finial
XX
XX