Model #5SGZ1403-2CTN USE AND CARE GUIDE HARD TOP GARDEN HOUSE Questions, problems, missing parts? Before returning to the store, call Hampton Bay Customer Service 8.00 a.m. - 7.00 p.m. EST, Monday - Friday, 9.00 a.m. - 6.00 p.m. EST, Saturday 1-855-HD-HAMPTON HAMPTONBAY.COM THANK YOU garden house. to continually create quality products designed to enhance your home. Visit us online to see our full line of products available for your home improvement needs.
Table of Contents Table of Contents ........................................................2 Safety Information .......................................................2 Care Instructions ....................................................................2 Pre-Assembly ............................................................3 Planning Assembly...................................................................3 Part List...................................................................................
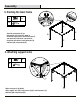
Pre-Assembly PLANNING ASSEMBLY It will take at least two people about 40 minutes to complete the assembly process. A rubber mallet and a free standing ladder are needed during the process. PART LIST NOTE: Parts not shown to actual size.
Pre-Assembly NOTE: Hardware not shown to actual size.
Assembly 1 Attaching netting rails A CC 32 CC CC GG CC B CC A CC CC CC CC K CC CC CC Attach one netting rail (K) to each cross beam (A)/(B) with four self-tapping screws (CC) using Philips screw driver (GG). 2 Assembling cross beams A B AA Z L M6x15 32 16 B A B Z A 4 EE AA A/B AA B A B L A B A Plug U-shaped connector (L) into each cross beam (B), using bolts (AA) loosely secure them together until the end of this step.
Assembly 3. Erecting the main frame AA B AA M6x15 A A 16 K EE AA AA C C C Stand the corner posts (C) up. Attach the B side of the cross beam to the outside right corner of each corner post (C) and attach the A side of the cross beam to the outside left corner of each corner post (C) with bolts (AA) using wrench (EE). C C 4. Attaching support arms AA M6x15 16 A B EE M M M AA AA C Adjust corner posts (C) upright.
Assembly 5. Assembling the roof frame D D U D D click! U D D D D Snap one corner roof tube (D) into each receiver of the roof hub (U) until you hear a click. 6. Attaching the roof frame BB M6x30+Nut V D D 4 EE U D D W FF V With the ladder in the center of the main frame. Place the roof frame onto the top of the main frame. D Attach each roof tube (D) onto the bracket at the top of each corner post (C) with bolts and nuts (BB) using wrenches (EE) and (FF).
Assembly 7 Attaching roof sheet rails (E,F,G,H) X 8 AA 24 BB EE M6x15 M6x30+Nut D H X BB G H 16 B G E F H Fig. 7.2 AA H Fig. 7.1 F FF G E E G F H H F E G Attach roof sheet rails (H) and (G) onto corner roof tube (D) with washer plates (X) and bolts (BB) using wrench (EE). (Fig.7.1) Do not fully tighten bolts until the end of step 10.
Assembly 8 Attaching roof tubes (J) from underneath Y 8 AA 8 M6x15 J J X X J Fig. 8.1 D D J X X J EE X J Fig. 8.2 AA Fig. 8.3 Y F E E/F X J J D E X Fig. 8.4 F J Y J Y J X J Y F Y J Y E J J J Y J X J Y J YJ X J J Fig. 8.5 E E/F F Fig. 8.6 From the upper part of each corner roof tube (D) hook one end of roof tube (J) onto the small peg on washer plate (X). (Fig. 8.1) Secure the other end of roof tube (J) onto the small peg on the opposite washer plate (X).
Assembly 9 Q R P O Installing roof sheets D R N P Q N O Q R P N R Q O N H O P R Q Q O Important: Do not remove the protective film from the roof sheets until you are ready to attach them to the frame. During assembly remove the protective film from each roof sheet as you attach them to the frame. Slide each roof sheet (N) into the rails (F/E) at until they fit securely at the top of the frame.
Assembly 11 Attaching end covers and staking the gazebo HH 4 II 16 AA M6x15 HH I 20 AA EE DD II D HH I II II II 8 At the end of each corner roof tube (D), cover the adjacent ends of each two roof rim with one end cover (HH) and one bolt (AA) using wrench (EE). HH At each side of the frame cover the remaining adjacent ends of each two roof rims with one end cover (II) and one bolt (AA) using wrench (EE).
Questions, problems, missing parts? Before returning to the store, call Hampton Bay Customer Service 8.00 a.m. - 7.00 p.m. EST, Monday - Friday, 9.00 a.m. - 6.00 p.m. EST, Saturday 1-855-HD-HAMPTON HAMPTONBAY.COM Retain this manual for future use.