
Instructions / Assembly


Assembly
3
4
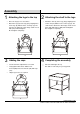
Completing the assembly
□
□
5
Adding the caps
Place the table right side up.
This table is now ready for your enjoyment.
1
2
Attaching the legs to the top
□
Place the top (A) on a soft surface.
Attach the legs (E) to the top (A) by aligning holes
on the legs (E) with the holes on the top (A). The
legs must be attached as this image shown. Insert
□
Attach the shelf (F) to the legs (E) by aligning holes
on the shelf (F) with the holes on the legs (E). The
shelf must be attached as this image shown. Insert
bolts (AA) with washers (BB) and hand tighten.
Do not tighten completely.
□
bolts (AA) and hand tighten.
Do not tighten completely.
Please contact 855-HD- HAMPTON for further assistance.
HAMPTONBAY.COM
1-
Attaching the shelf to the legs
AA
A
E
E
E
F
E
A
AA
BB
E
F
E
A
CC
□
□
Check and make adjustments as needed.
Fully tighten all the bolts with the Hex
□
Adjust leg levelers as required.
wrench (DD) and cover the bolts (AA) with caps
(CC).