
Instructions / Assembly

10
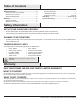
Please contact 855-HD-HAMPTON for f
HAMPTONBAY.COM
urther assistance.
1-
E
F
4
BB
DD
DD
BB
F
E
C
F
E
C
DD
A
A
D
D
A
A
DD
AA
AA
DD
AA
D
D
E
F
C
G
A
A
D
D
AA
D
D
G
F
E
C
J
J
L
L
2
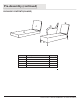
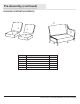
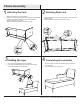
Loveseat Assembly
1
Attaching the back
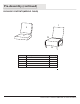
Attaching Left arm
Place the seat (E) on a soft surface.
Attach the seat (E) to the back (F) ,fasten with bolts (BB)
with washers (DD) as illustrated.
Tighten half way using the Hex wrench (FF).
Attach the left arm (C) to seat (E) fasten with bolts (AA)
and washers (DD). Tighten half way using the Hex
wrench(FF). Do not tighten completely.(Fig 1)
Attach the back (F) to the left arm(C) by aligning the hole
on the back (F) with the hole on the left arm (C).Insert
bolts(AA)with washers (DD) and tighten half way using the
Hex wrench (FF). (Fig2)
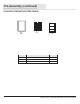
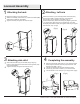
3
Attaching side skirt
holes on the seat (E) with the holes inserting bolts (AA)
with washers (DD).
Tighten half way using the Hex wrench (FF).
Attach the side skirt (G) to the seat (E) by aligning
E
E
D
D
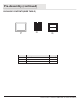
Completing the assembly
Place the loveseat right side up. Fully tighten all the
bolts (AA) with the Hex wrench (FF) and cover with
the bolt caps (EE). (Fig 1).
Adjust leg levelers as required. Place the seat
cushion (L) and back cushion (J) on the loveseat.
This loveseat is now ready for your enjoyment.(Fig2)
(Fig1)
(Fig 2)
(Fig1)
(Fig 2)