
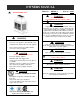
Instructions / Assembly

10
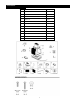
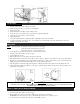
4 Wearing heat resistant gloves position a long lit match or lit long neck lighter close to the burner ports.
DO NOT lean over the burner while
lighting.
5 Push and turn burner control knob to the "LOW" position. The burner should lit within 5
seconds.
6 If ignition does occur within 5 seconds, turn the burner control knob to "OFF", wait 5 minutes for gas
to clear and repeat the lighting procedure. If burner still will not light, refer to
the
Troubleshooting
Section
.
7 Flame height can be changed by adjusting the burner control knob between the "LOW"
and
"HIGH"
positions.
8 Always check burner flames periodically to ensure proper operation. Flames should be
mostly
yellow with some blue for best performance.
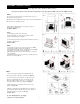
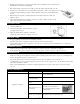
TO EXTINGUISH
1
Push and turn burner control knob to the "OFF"
position.
2
Close the LP tank valve.
3. Disconnect the regulator from the LP tank to close
the
gas supply when not in
use.
4. Make sure that the unit is completely cooled before
touching any of the components or putting on the
cover.
ROUTINE CARE
• Keep your appliance free and clear from combustible
materials.
• Visually inspect burner for obstructions, keep tank enclosure free and clear from debris.
• After the burner and lava rocks are completely cooled down, use a soft brush to get rid of the mild stains, loose dirt and soil.
Wipe with a soft
cloth.
STUBBORN STAINS
• Stubborn stains, discoloration and possibly rust pitting can occur from exposure to harsh outdoor
conditions.
• Be careful not let any powder or solvent come in contact with painted or plastic components as damage may occur.
MAINTENANCE
• Store the appliance in a cool dry place away from direct sunlight.
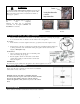
• Make sure both the gas and the appliance are turned off before changing battery. Please refer to the process of inserting battery.
• Protect your appliance with the cover when not in use.
• The propane cylinder must be disconnected and stored outdoors before the appliance can be stored indoors.
• Use Manufacturer approved or supplied replacement parts and accessories only. Otherwise may void the warranty of this product
and result in a hazardous condition.
• Please contact the Manufacturer for information regarding replacement hoses, thermocouples, ignitors, lava rocks, ceramic
logs, etc.
TROUBLESHOOTING
PROBLEM
CAUSE
CORRECTIVE
ACTION
Appliance won't
light
Igniter pin and burner
are
wet
Wipe dry with a cloth
Igniter battery is
incorrectly inserted.
Check that battery is correctly
inserted.
Igniter pin cracked or
broken
Call customer service for replacement part
Electrode wire is loose
or
disconnected
Reconnect wire to the igniter box
located inside the table base
behind
the igniter button
Electrode wire is shorting
between valve and
igniter
pin
Call customer service for replacement part