
Warranty

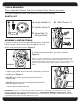


TOOLS REQUIRED
PARTS LIST
Estimated assembly time: 5 minutes (Not including mounting)
A. Crank Handle (1) B. Allen Screw (1)
D. Hose Reel (1)
(Not pictured)
2
1. Align the holes in the crank handle (A) with crank handle shaft.
Tighten using the Allen wrench and screw (B). Do not over
tighten crank handle Allen screw.
Figure 1
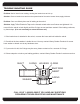
2. Attach the leader hose (C) to the swivel connector.
Figure 2
Note: If you have trouble with the swivel turning and kinking the leader
hose, try spraying a silicone spray inside to lubricate the O-rings. The
O-rings located inside the swivel may be dry. You can reach the O-rings
by taking off the retaining clip or spraying inside the opening of the
swivel.
3. Attach your garden hose to the hose connection on the hose
reel (D) spool.
Figure 3
• DO NOT leave water running through the hose reel
unsupervised.
• DO NOT expose the reel to freezing temperatures with
water remaining in the unit.
• Turn the water off after each use.
ASSEMBLY INSTRUCTIONS
Pliers, Adjustable Wrench, Drill (Not included) & Allen Wrench (Included)
FIGURE 3
C. Leader Hose (1)
A
B
C
FIGURE 2
IMPORTANT: LAY OUT ALL PARTS AND FASTENERS. MAKE SURE ALL PARTS ARE ACCOUNTED FOR. IF ANY PART IS
MISSING PLEASE CONTACT LIBERTY GARDEN PRODUCTS AT
1-866-820-5805, MONDAY - FRIDAY 9 A.M. - 5 EST.
DO NOT CONTACT THE RETAILER.
YOU CAN ALSO VISIT OUR WEBSITE, WWW.LIBERTYGARDENPRODUCTS.COM,
FOR MORE INSTRUCTIONS PICTURES AND HELPFUL HINTS.
B
D
A
FIGURE 1
C
D
D