
Installation Guide

5
NOTE: Hand tighten finials only. Do not use any tools
as overtightening may occur causing damage to the
fixture housing.
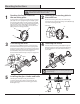
Insert the xture mounting screws (CC) into the mounting
plate (AA) and secure by tightening the nuts (CC) against
the mounting plate. Make sure the mounting screws (CC)
do not protrude too much or too little from the mounting
plate. You may need to adjust them to proper length.
Tighten the nuts on the screws (CC) to secure the screws
(CC) against the mounting plate (AA).
Ataching the xture screws to
the mounting plate
CC
CC
A
B
EE
GREEN
GROUND
NEUTRAL
WHITE
BLACK
POWER
SUPPLY WIRE
AA
AA
DD
OUTLET BOX
CC
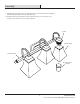
Connecting the wires
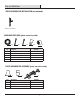
Installing the glass shades and bulbs
Attaching the xture
Ataching the mounting plate to
the outlet box
Attach the mounting plate (AA) to the outlet box by
inserting the two outlet box mounting screws (BB) through
slots in the mounting plate (AA).
Using the wire nuts (DD) provided to connect the green
wire from the fixture to the green or bare copper ground
(house) wire. If the outlet box is grounded, you may fasten
the fixture ground wire directly to the outlet box. Connect
the white fixture wire(s) to the neutral supply wire.
Connect the black fixture wire(s) to the power supply wire.
Insert the xture mounting screws (CC) through the
fixture housing holes and secure by hand tightening
the nials (EE) to the ends of the xture mounting
screws (CC).
Slide the glass shade (A) into the glass holder and
secure by screwing the coupling lens fastener (B) onto
the glass holder. Repeat for the remaining glass shades.
Hand tighten only.
1
2
3
4
5
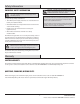
Mounting Instructions
CAUTION: TURN OFF THE MAIN POWER AT THE
CIRCUIT BREAKER BEFORE INSTALLING THE FIXTURE
IN ORDER TO PREVENT POSSIBLE SHOCK.