
Use and Care Manual

HIGH VELOCITY OSCILLATING WALL MOUNT FAN
ASSEMBLY AND OPERATION INSTRUCTIONS
CAUTION:
Read and follow all instructions before operating fan. Do not use if any part is damaged or
missing.
WARNING:
To reduce the risk of fire or electrical shock, DO NOT use this fan with any solid state
speed control device. This appliance has a 3-prong grounded plug that must be inserted
into a matching outlet. To reduce the risk of electrical shock, this grounding plug must not
be cut off the plug. Where a two-prong wall outlet is encountered, it must be replaced:
contact a qualified electrician. DO NOT attempt to defeat this safety feature. Use your fan
only with adequate wiring that is up to code. Connect to properly grounded outlets only.
NOTE: Installation of this equipment should be performed by a qualified person. We do
not warrant any damage or injuries as a result of improper installation.
This fan is suitable for wet location. Suitable for Use In Wet Locations When
Installed In A GFCI Protected Branch Circuit.
RULES FOR SAFE OPERATION:
● Always unplug unit for cleaning.
● Always unplug unit when not in use.
● Do not place foreign objects through guard into the blade.
● Do not operate without fan guards properly locked.
● Do not use this fan with an extension cord.
● Do not place fan or any parts near an open flame, cooking or other heating
appliance.
● Do not operate this unit with a damaged cord or plug, especially when this unit has
been malfunctioned, dropped or damaged.
UNPACK YOUR FAN AND CHECK THE CONTENTS
● Motor Assembly
● Front / Rear Grille & Blade
● Wall Mounting Pipe &Base
● Owner’s Manual & Hardware Package
MOUNTING BASE ON A WOOD FRAMED WALL
1. Located a wall stud secure and solid enough to hold the weight of the base assembly.
Carefully located and mark the center of wall stud. If you do not have a solid
structural framing member at that location then you must provide an adequate
alternative for mounting the fan.
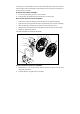
2. Place mounting bracket (1) against the wall centered with the centerline of the wall
stud and 4 holes.
3. Drill 4 holes on the wall and secure bracket to wall using 3 lag screws (3) provided.