
Instructions / Assembly
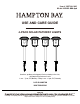


A
B
C
Installation
1
Assembling the solar lights
2
Preparing the solar panels
□ Insert the bottom of the solar light (A) into the top
of the pole (B).
□
Remove the ground stake (C) from the bottom of
the pole (B).
□
Insert the top of the ground stake (C) into the
bottom of the pole (B).
□ Repeat this step for each solar light (A), pole (B),
and ground stake (C).
NOTE
: To allow each battery to reach full capacity
and perform correctly, pull out the plastic tab and
place the solar light in full sunlight for the first 12
hours. Failure to do so can shorten the life of the
battery or operation of the light. On cloudy or rainy
days it may take several days for the batteries to fully
charge.
NOTE: To protect the solar panel from damage, do
not use force during assembly. Keep the plastic
shades in the packaging until you need to install
them.
□ Twist off the top of the solar light (A) and remove
the tab from the battery compartment (1) located
on the underside of the solar panel top.
□ Twist the top of the solar light back on.
□ Repeat these steps for each solar light.
4
1