
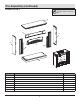
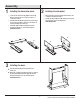
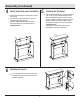
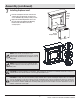
Instructions / Assembly


10
Operation
Operation
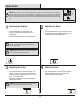
Push the Power button to supply power to all
functions of the replace and put the insert in a
standby mode.
Push the Power button again to turn off all functions.
Press the Heater button to set the thermostat. Your
replace consists of a fan-forced wire-element-type
heater. The thermostat setting range is 62°F - 82°F or
17°C - 27°C or always ON.
This button on the remote control only turns ON and
OFF the heater function.
Press the Flame button to increase and decrease the
ame intensity. There are 6 brightness levels you can
cycle through as well as the OFF setting.
Press the Timer button to cycle through the 10 timer
settings (30 minutes, 1 Hour, 2H, 3H, 4H, 5H, 6H,
7H, 8H and 9H) and the OFF setting.
1
3
2
4
Powering the replace
Adjusting the heater
Adjusting the ame
Setting the timer
NOTE:
To change between °F and °C press and hold the
Heater button on the control panel for 10 seconds.
NOTE:
The control panel can be accessed at the upper-right corner of the insert. When a function is changed
from the control panel or remote control there will be a corresponding indicator (see Figure 1) on the upper-right
of the projection screen. The indicator shows the function changed and the level selected by the control panel or
remote control. When the function is turned off, the corresponding indicator will ash several times and then fade
off.
NOTE:
Holding the Power button on the control panel for
10 second will disable the heater function.
NOTE:
All previous settings are held in memory, so the
next time you power up the replace, the unit will turn on
with the same settings.
°
°
C
F
Fig . 1