
Instructions / Assembly


9
HAMPTONBAY.COM
Please contact 1-877-527-0313 for further assistance.
Assembly (continued)
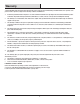
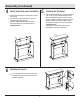
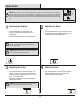
Install
Insert
From
Back
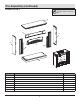
Electric
Fireplace Insert
Lift insert carefully into the back of the unit and
center in the insert opening. Do not drag insert
across Hearth/Base (A) as it may scratch your unit.
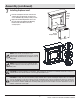
Replace the two Mounting Brackets and secure
the insert in place by tightening the Mounting
Bracket Screws and make sure insert is
securely in place
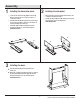
7
Installing replace insert
NOTE:
Please read all “electric replace insert”
instructions prior to installing electric insert in your completed
replace mantel. Install the insert in your replace close to its
nal position.
NOTE:
Use great care to move your completed unit. Move
it only short distances, and use two people to move it into its
nal position.
CAUTION:
Cold climate installation recommendation: When installing this unit against a non-insulated exterior wall or chase, it is
mandatory that the outer walls be insulated to conform to applicable insulation codes.
CAUTION:
A 15-Amp, 120-V, 60 Hz circuit with a properly grounded outlet is required. Preferably, the replace will be on a dedicated
circuit as other appliances on the same circuit may cause the circuit breaker to trip or the fuse to blow when the heater is in operation. The
unit comes standard with 6-ft. three-wire cord, exiting from the rear of the replace. Avoid using an extension cord. If an extension cord must
be used, it must be a minimum 14 AWG, three wire with grounding type plug connector and rated not less than 1875 watts. Do not use an
extension cord more than 20 ft. in length.