
Installation Guide


10
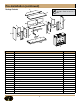
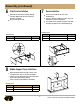
Assembly (continued)
Locate Mantel/Top (G) and lay nished side up on top of
completed assembly.
From the inside, attach the Mantel/Top (G) using
Bolt (AA) through the pre-drilled holes in the Plastic
Connector. Hand Tighten Only.
Use a Phillips head screwdriver, tighten all Bolts
alternating top and bottom, left and right.
Attach the Side Back Panel (K) and the Center Back
Panel (Q) to the back of the completed assembly from
step 9.
Using a Phillips Head screwdriver, tighten screws (EE)
through the pre-drilled holes in the Back Panels to the
completed assembly.
Use a Phillips Head Screwdriver to tighten the bolts that
were left hand tightened.
9 10
Mantel Top installation Back Panel installation
11
Door installation
Hardware Used
Hardware Used
Hardware Used
Part Description Qty
AA Bolt 5
Part Description Qty
FF Knob 2
Part Description Qty
EE Screw 24
AA EE
G
Q
K
K
L
M
FF
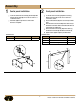
Locate Right Front Door (M) and Left Front Door (L)
and slide door hinge keyhole into panel hinge bracket.
(Diagram 1)
Use Phillips Head Screwdriver to tighten screws.
(Diagram 2)
TO ADJUST HINGES:
To adjust door forward or backward change
keyhole slot position. (As Shown In Diagram 3a)
To adjust door right or left loosen/tighten
screw. (As Shown In Diagram 3b)
To adjust door up or down adjust bracket height.
(As Shown In Diagram 3c)
Attach the Knob (FF) to the Left Front Door (L) and
Right Front Door (M), using the bolts attached through
the pre-drilled holes in the doors.
Use a Phillips Head Screwdriver to tighten the bolts.