
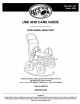
Installation Guide

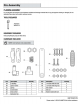


Assembly (continued)
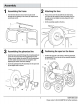
5
Atta
州
g
the
spo
川
d
handle
口
On
the
side
of
the
spool
opposite
from
the tee
assem
bl
y,
slide
a
plastic
spacer
washer
(BB),
spri
ng
(CC),
and
another
pl
astic
spacer
washer
(BB)
over
the
end
of
the
spoo
l
(A).
口
Attach
the
spool
(A)
to
the
ca
此
assembly
using
a
U-bushing
(陆.)
a
nd
two
1.75
bolts
with
nuts
(GG)
.
口
Th
read
the
crank
handle
(DD)
onto
the
end
of
the
spool
pipe.
口
Attach
伽
e
rubber
handle
(KK)
to
the
crank
handle
(DD)
using
伽
e
handle
bolt
attached
to
the
h
andle
(KK).
Tighten
securely
.
6
Attaching
the
spool
to
the
water
supply
side
口
Tu
rn
the
spoo
l
around.
Attach
the
second
U-bushing
(灿)
on
t
he
wa
t
er
s
up
ply
side
using
the
1.75
in
.
bolts
a
nd
l
ock
nuts
(GG)
.
Make
sure
t
he
bushings
a
『
e
orie
n
ted
over
the
holes
on
the
frame
.
Yo
u
may
h
ave
to
compress
the
sp
『
ing
to
get
the
spoo
l
or
i
ented
properly.
8
Atta
州
g
the
lea
阳
hose
口
::丁尘骂;:
11~H~~~
(阳
the
end
of
the
sw
iv
ω
啕跑
跑
7
Attaching
the
U-handle
o
Slide
the
U-
hand
le
(D)
over
the
frame
extensions
and
align
the
holes.
lnse
『
t
1.
57
in.
bo
l
ts
(HH)
through
the
handle
holes
and
attach
with
w
ing
nuts
.
D
飞
•
> ,
9
Attaching
阳
garden
hose
the
galvanized
tee).
Loop
the
hose
over
the
spool
end
(as
sh
ow
n)
to
avo
id
kinking
.
6
HAMPTONBAY.COM
Please
contact
1-855-
HD
-H
AMPTO
N
for
further
assistance.