
Instructions / Assembly


6
Key Hole Installation
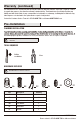
1
Removing the switch housing
cover
□ Remove the switch housing cover (1) from the
fan by unscrewing the screws (2). You may
keep this cover (1) for future use.
□ Replace the two screws (2) but thread only
halfway into the switch housing.
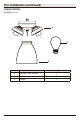
4
Installing the light kit
□
Attach the light kit (A) by aligning its key
hole slots with the two screws (1) previously
threaded halfway into the switch housing.
Push up so the screws (1) go through the key
hole slots on the light kit (A) and twist so that
the screws engage into the smaller end of
the slots. Tighten the screws (1) securely to
prevent the light kit from vibrating loose.
□
Proceed to the Shade Installation section.
Reconnect the light kit to the adapter cup
with the screws removed in step 2.
2.5"
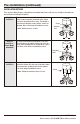
3
Connecting the wires
□
Locate two single wires in the switch housing,
white (gray on some models) and blue (red on
some models) labeled “for light”.
□
A. For French Canadian, use the plug connect
system to connect white (gray) to white
and blue (red) to black.
B. Cut off the plug from the light kit wires
and strip the wires. Connect white or gray
wire from the ceiling fan to the white
wire from the light kit (A) with a wire nut
(AA), connect blue or red wire from the
ceiling fan to the black wire of the light
kit (A) with a wire nut (AA). Wrap the wire
connectors with electrical tape for a more
secure connection.
□ Carefully push all the wires back into the
switch housing.
Connect the fixture wires to the light kit wires:
Remove the adapter cup (1) from the top of the
light kit by removing the screws (2) on the side
of the light kit.
Removing the adapter cup
AA
A
1
A
1
2
1
2