
Instructions / Assembly


7 HAMPTONBAY.com
Please contact 1-855-HD-HAMPTON for further assistance.
Universal Installation
1
Removing the switch housing
cover
□ Remove the switch housing cover (1) from the
fan by unscrewing the side mount screws(2)
□ Remove the plug (3) from the center of this
cover by unscrewing or pushing out. You may
discard the plug.
2
3
1
2
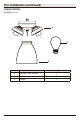
Attaching the cover to the light
kit
□ Attach the cover (1) to the light kit (A) threaded
(black and white) through the hole in the cover
(1) and then screwing the cover (1) onto the
threaded tube (2). Be sure it is tight enough to
prevent the light kit (A) from vibrating loose.
□ Place the star washer (EE), lock washer (DD),
and hex nut (FF) over the light kit wires onto
the threaded tube, and tighten the hex nut (FF).
3
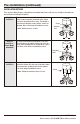
Connecting the wires
□ Locate two single wires in the switch housing,
white (gray on some models) and blue (red on
some models) labeled “for light”.
□
A. For French Canadian, use the plug connect
system to connect white (gray) to white
and blue (red) to black.
B. Cut off the plug from the light kit wires
and strip the wires. Connect white or gray
wire from the ceiling fan to the white
wire from the light kit (A) with a wire nut
(AA), connect blue or red wire from the
ceiling fan to the black wire of the light
kit (A) with a wire nut (AA). Wrap the wire
connectors with electrical tape for a more
secure connection.
□ Push all wires back into the switch housing.
□
Reconnect the cover with the screws removed in step 1.
Proceed to the Shade Installation section.
tube (2) by first feeding the light kit wires
FF
DD
EE
1
2
A
Connect the fixture wires to the light kit wires: