
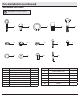
Instructions / Assembly


10
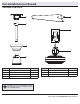
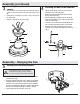
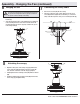
Assembly - Hanging the Fan (continued)
Making the electrical connection
□ Please refer to WINK remote installation
instructions at the beginning of this
document.
9
IMPORTANT: Use the wire connecting nuts (DD) supplied with
your fan. Secure the connectors with electrical tape and ensure
there are no loose strands or connections.
WARNING: Each wire not supplied with this fan is designed to
accept up to one 12-gauge house wire and two wires from the
fan. If you have larger than 12-gauge house wiring or more
than one house wire to connect to the fan wiring, consult an
electrician for the proper size wire nuts to use.
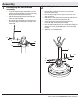
Assembly (continued)
Attaching the fan blades
10
□ Position the blade assembly (E) on the motor so the
mounting screw holes align with the threaded holes.
□ Turn the screw (MM), spring washer (KK), and at washer
(LL) into the hole but do not completely tighten. Make sure
the second hole in the blade assembly aligns with a hole in
the motor housing (G).
□ Install a second screw (MM), spring washer (KK) and at
washer (LL) in the blade assembly in the same manner.
□ Repeat for the remaining blades.
□ Tighten all screws.
G
E
MM
KK
LL
NOTE: The blade and blade arms are pre-assembled
together at the factory. The blades feature new technology
for higher efciency. The blades are not reversible.