
Instructions / Assembly


Assembly — Installing the Light Kit
16
11
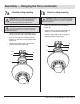
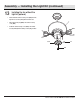
Attaching the light kit to
the switch housing
□ Remove the three light kit mounting screws (HH)
from the light kit (I) and keep these screws.
□ While holding the light kit (I) under your fan motor
assembly (F), locate two single white and blue wires
in the switch housing labeled "FOR LIGHT". Make the
polarized plug connections:
- White to white
- Blue to black
□ Carefully push all wires back into the switch housing.
Install the light kit assembly (I) onto the switch
housing with the three light kit mounting screws (HH)
removed previously. Be sure to tighten all screws.
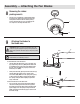
CAUTION: Before starting the installation, disconnect the
power by turning off the circuit breaker or removing the fuse
at the fuse box. Turning power off using the fan switch is not
sufficient to prevent electric shock.
12
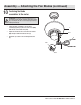
Mounting the glass shade
□ Remove the nut (II), glass cap (JJ) and decorative nut
(KK) from the light kit (I).
□ While holding the glass shade (J), slip the pull chain
(FFF) from the switch housing into the outside hole in
the glass shade (J).
□ Feed the pull chain (FFF) from the light kit stem
through the eyelet in the glass shade (J).
□ Place the glass shade (J) over the light kit stem.
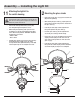
Secure the glass shade (J) with the nut (II).
□ Fit the glass cap (JJ) onto the light kit stem, and then
slip the pull chain (FFF) from the side hole in the
glass shade (J) through the hole on the side of the
glass cap (JJ).
□ Feed the pull chain (FFF) from the light kit stem
through the decorative nut (KK), and then thread the
decorative nut (KK) securely. Do not overtighten.
HH
I
F
FFF
FFF
J
JJ
II
I
KK
F