
Installation Guide


11
INSTALLATION
REQUIREMENTS (CONTINUED)
GENERAL INFORMATION INSTALLATION REQUIREMENTSPRE-INSTALLATION INSTALLATION
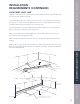
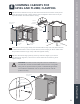
Measure out 20-7/8" from the wall (where the base cabinet’s toekick line will be) and snap
alineontheoorparalleltothewall.
Tondthehighestpointontheoor,placeoneendofa6'orlongerlevelattheendof
thecabinetrun.Checkthebubble.Raiseeitherenduntilitislevel.Marktheooratthe
endthatmakescontactwiththeoor.Thisisthehighpoint.
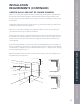
Check all around the room where base cabinets will be installed. Then check from high
point to high point to determine the highest point.
Whenyouarecertainyouhavethehighestpointontheoor,placeyourlevelonthis
point and the other end against the wall.
Mark the wall at the bottom of the level. Do this in all directions where cabinets will be
located.
Measure 34-1/2" up from the high point level line. Use a level to strike a level line on the
wall. This is the Base Cabinet Top Level Line (without countertop). Do this on all walls that
will receive base cabinets.
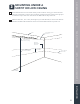
HIGH POINT LEVEL LINE
20-7/8"
to Toekick
Base Cabinet
Level Line
34-1/2" from
High Level Line
34-1/2" from
High Level Line
This line may need to move out
if the wall bows out or leans in.
Highest Point
34-1/2"
Mark wall.
20-7/8"
Shim to Level
Level
Toekick Line
Toekick Line
Mark floor
at high point.