
Installation Guide


9
INSTALLATION REQUIREMENTS
Installation is done properly.
Door and drawers will require some adjustments at the end.
Cabinets too far out of level, not shimmed correctly or supported incorrectly will end up
exceeding the range of adjustment the product was designed for.
GENERAL INFORMATION INSTALLATION REQUIREMENTSPRE-INSTALLATION INSTALLATION
YOUR RESPONSIBILITY AS THE INSTALLER
WARNING: Be careful to follow the leveling, shimming, and support
process outlined to avoid exceeding the adjustment limits of the
cabinet door hinges and drawer slides.
WARNING: Failure to follow these guidelines could result in a
cabinet falling off the wall, possibly resulting in serious injury, and
will void the product warranty.
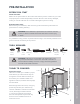
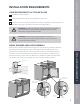
Remove doors, drawers and shelves so they aren’t in the way during installation. Removal
also makes the cabinets lighter to move. Label each piece with masking tape so you
know where to reinstall each piece. Store them face to face to avoid damage. Remove
the screws on the door hinges where they attach to the face frame. Pull drawers out to
the stop and push in levers under the drawer box to release the drawer from the glides.
For shelves, push in the top of the shelf clip so you can lift the shelf up and out.
DOOR, DRAWER AND SHELF REMOVAL
Small Clip
Push
Shelf
Remove
screw.
Door
Hinge
Cabinet Face
Frame Plate
Remove
screw.
Door
Hinge
Cabinet Face
Frame Plate