
Instructions / Assembly


[ 5 ] [ 6 ]
3. Cabinets should also be shimmed out from the wall to maintain a straight line. Hampton Bay Designer Series
cabinets are designed to be a “frameless construction” which means when the cabinets are screwed together
they will be forced into a straight line regardless of how wavy or bowed the wall or surface they’re fastened to
may be.
FASTENING CABINETS TO THE WALL
1. Screw wall cabinets and tall cabinets to the predetermined height through the back panel into a stud. Make
sure to place screws 1� below the top and 1� above the bottom. Measure and mark the stud location on the
cabinet before drilling. Use #8 x 2-1/2� at head screws when fastening through a single layer of drywall into
wood studs.
2. Place a screw at the
top of the cabinet
and the bottom of a
cabinet in as many
studs as can be locat-
ed in the cabinet
width.
FASTENING CABINETS TOGETHER
1. Align cabinet frames together
carefully.
2. Cabinet cases can be clamped to-
gether using various kinds of clamps,
however use caution with any kind
of steel clamp to not damage the
surface material of the cabinet.
3. Screw cabinets together with
#7 x 1-1/8� at head screws.
INSTALLING FILLERS
1. Cabinets come is 3� increments in width, therefore llers will
be required when cabinets are to t between walls.
2. Measure the space between the wall and the cabinet at the
top, middle and bottom. If the dimensions are close to the
same you can rip (saw) the ller in a straight line to the proper
width to t.
3. Next, predrill holes for 1 ¼� screws and screw the llers from
the inside of the cabinet.
4. In a case where the wall is not plumb, the ller will have to be
cut to t to the uneven wall.
Place screws
1� below
the inside
top of
cabinet
Place screws
1� above
the inside
bottom of
cabinet
6
• Fastening Cabinets Together
1. Align cabinet frames together carefully.
2. Cabinet cases can be clamped together using various kinds of clamps, however use caution
with any kind of steel clamp to not damage the surface material of the cabinet.
3. Screw cabinets together with #7 x 1-1/8” flat head screws.
• Installing fillers
1. Cabinets come is 3” increments in width, therefore fillers will be required when cabinets are to fit
between walls.
2. Measure the space between the wall and the cabinet at the top, middle and bottom. If the dimensions
are close to the same you can rip (saw) the filler in a straight line to the
proper width to fit.
3. Next, predrill holes for 1
¼” screws and screw the fillers
from the inside of the cabinet.
4. In a case where the wall is
not plumb, the filler will have to be
cut to fit to the uneven wall.
3”
2 ¾”
¾””
2 ½”
1/2”
¾””
6
• Fastening Cabinets Together
1. Align cabinet frames together carefully.
2. Cabinet cases can be clamped together using various kinds of clamps, however use caution
with any kind of steel clamp to not damage the surface material of the cabinet.
3. Screw cabinets together with #7 x 1-1/8” flat head screws.
• Installing fillers
1. Cabinets come is 3” increments in width, therefore fillers will be required when cabinets are to fit
between walls.
3”
2 ¾”
¾””
2 ½”
1/2”
¾””
5
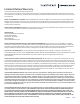
Wrong
Right
• Fastening Cabinets to the Wall
W3036
W3036 W3036
W3036
W3036
W3036
Correcting for a “Bowed In” or “Bellied” Wall Condition
Boxes are at an angle
to each other
Box faces are
not aligned
Proper shimming will allow cabinet boxes to be aligned along a flat plane
and the door facia to be adjusted within acceptable tolerances
W3036
W3036 W3036
W3036
W3036
W3036
Correcting for a “Bowed In” or “Bellied” Wall Condition
Boxes are at an angle
to each other
Box faces are
not aligned
Proper shimming will allow cabinet boxes to be aligned along a flat plane
and the door facia to be adjusted within acceptable tolerances
cabinet
Right
5
Wrong
Right
• Fastening Cabinets to the Wall
W3036
W3036 W3036
W3036
W3036
W3036
Correcting for a “Bowed In” or “Bellied” Wall Condition
Boxes are at an angle
to each other
Box faces are
not aligned
Proper shimming will allow cabinet boxes to be aligned along a flat plane
and the door facia to be adjusted within acceptable tolerances
W3036
W3036 W3036
W3036
W3036
W3036
Correcting for a “Bowed In” or “Bellied” Wall Condition
Boxes are at an angle
to each other
Box faces are
not aligned
Proper shimming will allow cabinet boxes to be aligned along a flat plane
and the door facia to be adjusted within acceptable tolerances
cabinet
Wrong
CORRECTING FOR A “BOWED IN” OR “BELLIED” WALL CONDITION
Boxes are at an angle
to each other
Box faces are
not aligned
5
Wrong
Right
• Fastening Cabinets to the Wall
W3036
W3036 W3036
W3036
W3036
W3036
Correcting for a “Bowed In” or “Bellied” Wall Condition
Boxes are at an angle
to each other
Box faces are
not aligned
Proper shimming will allow cabinet boxes to be aligned along a flat plane
and the door facia to be adjusted within acceptable tolerances
W3036
W3036 W3036
W3036
W3036
W3036
Correcting for a “Bowed In” or “Bellied” Wall Condition
Boxes are at an angle
to each other
Box faces are
not aligned
Proper shimming will allow cabinet boxes to be aligned along a flat plane
and the door facia to be adjusted within acceptable tolerances
cabinet