
Installation Guide


6
Installation - New Construction
CAUTION: Make sure power is switched off at service panel
before starting installation.
NOTE: Ceiling mount only.
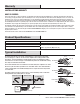
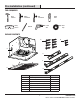
1
Attaching the fan housing to the
ceiling joist
CAUTION: Allow for the thickness of ceiling board used in
your application. Do not ush mount to the joist. Flange should
be ush with the bottom of the ceiling board.
□ If spacing between joists is 12 in. apart, use four long wood
screws (C) to attach the fan housing (A) directly to the
joists from the bottom through the ceiling board.
C
A
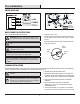
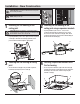
2
Attaching the fan housing to the
ceiling joist using suspension brackets
□ If spacing between joists is 16 in. - 24 in., insert
suspension bracket I (E) into the bracket cover on the
duct connector side of the fan housing (A). Then, attach
suspension bracket II (F) and suspension bracket III (G) to
the back of the fan housing (A).
A E
G
F
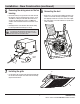
3
Securing the fan housing to ceiling
joist
□ Secure the fan housing (A) to the joist with suspension
brackets (F, G) using long wood screws (C).
A
C
F, G
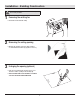
4
Securing suspension brackets onto
the fan housing
□ Secure suspension brackets (F, G) to the fan housing (A)
using the two machine screws (D) and secure suspension
bracket (E) to the other side of the housing using the
machine screw (D).
F, G
A
D
E
D