
Instructions / Assembly


6
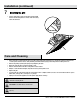
Installation
1
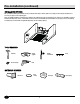
Determining joist width
□ Measure the distance from the center of the two ceiling
joists where you will be installing the ventilation fan.
2
Joint installation under 10 ½ in.
3 a
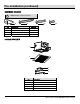
Suspension bracket installation
□ Use four long wood screws (BB) to attach the main body of
the fan to the ceiling joists.
□ Ensure the main body is level and square to the joists.
□ Tighten all screws.
CAUTION: Do not mount the fan flush against the joist.
The flange should be flush with the ceiling board.
□ For ceiling joist installations under 20 in., insert suspension
bracket I (C) into the fan body (A). Proceed to step 3b.
□ For ceiling joist installations between 20 in. and 24 in., insert
suspension brackets I (C), II (D), and III (E). Proceed to step 4.
□ Use the screw (DD) to secure the suspension bracket (C) to the
fan body (A).
□ Use the screws (CC) to secure the suspension brackets (D and E)
to the fan body (A).
□ Suspension brackets I (C) and II (D) should be secured at the
same side joist.
NOTE: Sliding hanger bars are provided to allow for
accurate positioning of the main body between joists.
BB
BB
A
D
D
C
C
C
D
E