
Installation Guide


CORNER BASE WITH LAZY SUSAN
Locate and mark all stud locations. Install 2" x 4" framing material (not included) as cleats to support
the countertop. Install cleats at base cabinet height (see step 1) and use level to ensure cleats are
level. Drill
3
⁄16" pilot holes through the cleat. Mount the cleat to the wall with #10 x 2-½" washer head
cabinet box installation screws (not included) into the holes until they are tight. Place the corner base
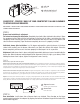
with lazy susan to be flush on the face with adjoining base cabinets. The diagram shown below is
noting a 36" corner clearance for installation of the corner base with lazy susan cabinet. There will be
excess space behind both sides of the cabinet where the cleats are located.
BASE ESQUINERA CON BANDEJA GIRATORIA
Localiza y marca todas las ubicaciones de los barrotes. Instala el material de 5.1 cm x 10.2 cm para enmarcar (no incluido)
como largueros para sostener el mostrador. Instala los largueros a la altura del gabinete base (ver paso 1) y usa un nivel
para garantizar que queden nivelados. Taladra orificios piloto de
3
⁄16 plg a través del larguero. Instala el larguero en la
pared, con los tornillos (no incluidos) de 10 x 2-½ plg y cabeza de arandela que se usan para instalar cajas de gabinete,
en los orificios correspondientes y hasta que queden bien ajustados. Coloca la base esquinera con bandeja giratoria de
manera que su frente quede al ras con los gabinetes de base adyacentes. El diagrama más abajo muestra un espacio de
91.4 cm en la esquina para instalar el gabinete de base esquinero con bandeja giratoria. Sobrará espacio detrás de ambos
lados del gabinete donde se ubican los largueros.
STEP 8
Installing adjacent base cabinets. Once the applicable corner cabinet is in place, install adjoining
cabinet by pre-drilling through the cabinet’s top back rail into the wall studs with the
3
⁄32" drill bit
approximately 2" deep. Secure the cabinet to the wall through the cabinet’s top back rail using 10 x
2-½" washer head cabinet box installation screws (not included) into the holes until they are nearly
tight. Note: to ensure a correct alignment between cabinets, do not tighten any hardware until all other
cabinets have been installed. Install the adjustable shelves in desired location using the provided shelf
pins. If applicable, continue with the lazy susan base cabinet installation by fastening the two cabinets
together using clamps and clamp the cabinet sides firmly. Be sure the cabinets are flush and level with
each other. Use 1" wood screws (not included) to attach the cabinets together. Continue installing the
remainder base cabinets in the same manner. Note: floor may not be level and wood shims may be
needed to fill the voided space between the cabinet and the floor (not included).
PASO 8
Cómo instalar gabinetes de base contiguos. Una vez que el gabinete esquinero correspondiente esté en su lugar, instala
el gabinete contiguo pre-taladrando, a través del riel posterior superior del gabinete, hacia dentro de los barrotes de pared
con una broca de
3
⁄32 plg hasta unos 5.1 cm de profundidad. Asegura el gabinete a la pared a través del riel posterior
superior del gabinete con los tornillos (no incluidos) de 10 x 2-
1
⁄2 plg y cabeza de arandela que se usan para instalar cajas
de gabinete, en los orificios correspondientes y hasta que queden bien ajustados. Nota: para garantizar una alineación
correcta entre los gabinetes, no ajustes ningún herraje hasta que todos aquellos hayan sido instalados. Instala las repisas
ajustables en el lugar deseado usando los pasadores de repisa incluidos. Si corresponde, continúa la instalación del
gabinete de base con bandeja giratoria sujetando los dos gabinetes juntos con prensas firmemente por ambos lados
Asegúrate de que los gabinetes queden al ras y nivelados entre sí. Usa tornillos de madera de 1 plg (no incluidos) para
unir los gabinetes. Continúa instalando de la misma manera los gabinetes base restantes. Nota: puede que el piso no esté
nivelado y se necesiten cuñas de madera (no incluidas) para rellenar los espacios vacíos entre el gabinete y el piso.
1
1
cleats (not included)
largueros (no incluidos)
36"
91.4cm
36"
91.4cm
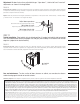
LAZY SUSAN POLE EXTENSION
Holding onto the upper pole
twist bottom pole counter
clockwise to release.
Extend until it rests firmly
against top mounting support,
twist to tighten.
EXTENSIÓN DE TUBO PARA
BANDEJA GIRATORIA
Sosteniendo el tubo superior, gire el tubo
inferior hacia la izquierda para aflojarlo.
Extienda el tubo hasta que descanse
firmemente en el soporte de montaje y
gire para apretar.
LAZY SUSAN SHELF
ADJUSTMENT
Raise shelf assembly to
desired height and tighten
the locking set screw.
AJUSTE DE REPISAS DE
BANDEJA GIRATORIA
Levante la repisa a la altura
deseada y apriete el tornillo de
presión.