
Instructions / Assembly


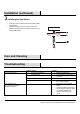


5 HAMPTONBAY.COM
Please contact 1-855-HD-HAMPTON for further assistance.
Assembly
Assembling the light fixture
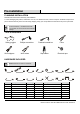
1. Preparing the fixture
Spread the arms (see Fig.1) so that the arms are at an equal distance from each other (see Fig. 2).
Thread the nipple (L) into the coupling (M) until tight (See Fig. 3).
Remove the metal finial (G), hex nut (F) and cup (E) from the nipple (N) (see Fig. 4).
Place the medium acrylic bobeche (NN) and cup (E) over the nipple and secure with the hex nut (N).
Re-attach the metal finial (G).
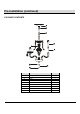
2. Attaching the beads
Attach the acrylic beads with ball (KK) to the metal finial (G).
Place the three small acrylic bobeche (MM) and candle sleeves (H) over each socket (I).
Attach one acrylic beads with pendant (JJ) to a ring (K) on each arm.
Attach two acrylic cluster of acrylic beads with pendant strand (LL) from the ring (P) on each small acrylic bobeche
to the ring (P) on the adjacent small acrylic bobeche (MM) (see Fig. 6).
Attach one acrylic cluster of acrylic beads with pendant strand (LL) to the ring (Q) (see Fig. 5).
Attach acrylic beads with strands (J) from the rings on the acrylic cup on the top of the center column (D) to the
rings (O) on the small acrylic bobeche (MM) (see Fig.6).
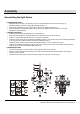
3. Preparing the chain
Use one quick link (B) to connect fixture loop (R) and the bottom of the chain (C).
Remove or add chain links from the chain (C) in order to achieve the desired fixture height for the mounting
location you have chosen.
Thread the fixture and copper ground wires up through every other link in the chain (C).