
Instructions / Assembly


6
Installation
1
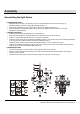
Installing the cross bar
2
Making the electrical
connections
CAUTION: Ensure the power is shut off at the main
fuse box prior to beginning installation.
Fasten the cross bar (BB) to the outlet box using
the two provided outlet box screws (DD).
Secure hex nut (EE) on the nipple (GG) after
placing the lock washer (FF) on the nipple (GG).
Thread the nipple (GG) on the cross bar (BB) until
the hex nut (EE) is tight.
Slide the screw collar nut (HH) and the canopy (A)
over the end of the chain (C).
Secure the screw collar loop (II) into the nipple
(GG) then use one quick link (B) to connect the
screw collar loop (II) and the top of the chain (C).
Insert the fixture wires up through the nipple (GG).
Connect the neutral wire (ribbed) (3) from the fixture
to the white wire (4) from the outlet box and the live
wire (smooth) (5) from the fixture to the black wire
(6) from the outlet box. Cover the two wire
connections using the two provided wire nuts (AA).
Wrap the two wire connections with electrical tape
for a more secure connection.
Attach the grounding wire connections with
electrical tape for a more secure connection.
Connect the copper ground wires from the fixture
and from the outlet box (2, 1) to the ground screw
(CC) on the cross bar (BB).
NOTE: If you have electrical questions, consult your
local electrical code for approved grounding methods.