
Instructions / Assembly
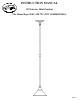


Page 4
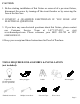
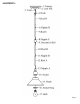
PARTS INCLUDED FOR ASSEMBLY (parts are not to scale):
1ea Canopy (#1) 1ea Hook (#4) 3ea Rods (#7, #10, #12) 1ea Nipple C (#8)
1ea Loop (#3) 1ea Rod D (#5) 1ea Decorative Ball (#9)
1ea Shade (#15) 1ea Socket Ring (#16)
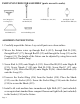
ASSEMBLY INSTRUCTIONS:
1. Carefully unpack the fixture. Lay out all parts on a clean surface.
2. Weave the fixture wires up through Rod A (#12), through Rod B (#10),
through Rod C (#7), through Rod D (#5) and through the Loop (#3) on the
Canopy (#1). The height of the fixture can be adjusted by using fewer rods
(each rod is 12 inches long).
3. Screw Rod A (#12) onto Nipple A (#13). Screw Rod B (#10) onto Nipple B
(#11). Screw Nipple C (#8) into Rod B (#10). Screw Rod C (#7) onto
Nipple C (#8). Screw Rod D (#5) onto Nipple D (#6). Attach the Hook (#4)
onto the Loop (#3).
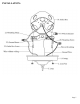
4. Unscrew the Socket Ring (#16) from the Socket (#14). Place the Shade
(#15) over the Socket (#14). Screw the Socket Ring (#16) onto the Socket
(#14) to secure the Shade (#15).
5. Install a 60 watt medium base incandescent light Bulb (#17) (not included)
or an equivalent standard base compact fluorescent light bulb (not included)
in the Socket (#14) in the fixture.