
Instructions / Assembly


COUNTERTOP - PROPERLY BUILD UP YOUR COUNTERTOP TO ALLOW CLEARANCE TO OPEN DOORS
AND DRAWERS.
MOSTRADOR - INSTALE BIEN EL MOSTRADOR DEJANDO EL ESPACIO NECESARIO PARA QUE LAS PUERTAS Y LOS CAJONES ABRAN
FACILMENTE.
STEP 8
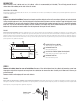
Drawer front installation & adjustment.
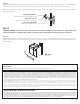
Full extension drawer glide installation: Completely close both slides attached to the cabinet. Move the component of the
slides with the ball bearings to the front of the slides, maintaining the slides completely closed. Carefully line up the slides of
the drawer box with the slides in the cabinets and close the drawer completely. Open the drawer completely to ensure it is
properly installed.
Unfinished drawer glide installation: In a 30 degree angle position, place the drawer in the base cabinet while making sure
the drawer slide wheels are above the cabinet slide wheels. Close the drawer completely and to ensure it has been properly
installed, open it as far as possible.
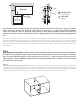
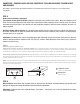
Adjustment: Hold drawer front in place and slightly loosen both adjustment screws located inside the drawer box. Move the
drawer to desired position for alignment (front, left, right, up, or down). While holding the drawer front in place, tighten the
alignment screws securely.
PASO 8
Instalación y ajuste de frente de cajón.
Instalación de correderas de cajón con extensión completa: Cierra completamente ambas correderas fijadas al gabinete. Mueve la pieza de las
correderas con los cojinetes de bola hacia la parte frontal de ellas, manteniéndolas completamente cerradas. Alinea con cuidado las correderas de cajón
con aquellas en los gabinetes y cierra el cajón por completo. Abre completamente el cajón para asegurar que está bien instalado.
Instalación de correderas de cajón sin acabado: En ángulo de 30 grados, coloca el cajón en el gabinete de base mientras aseguras que las ruedas de
las correderas del cajón queden por encima de las ruedas de las correderas del gabinete. Cierra el cajón completamente y, para garantizar que está bien
instalado, ábrelo tanto como sea posible.
Ajuste: Sostén la parte frontal del cajón en su lugar y afloja ligeramente los dos tornillos de ajuste ubicados dentro del cajón. Mueve el cajón a la posición
deseada para alinearlo (hacia adelante, a la izquierda, a la derecha, hacia arriba o hacia abajo). Mientras sostienes la parte frontal del cajón en su lugar,
aprieta bien los tornillos de alineación.
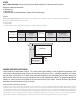
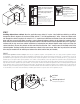
STEP 9
Door installation. Install doors after all drawer fronts are attached. Place the door on the hinge mounting plate located on the
end panel by aligning the teeth on the bottom hinge with the back of the bottom
Adjustment: All doors feature 6-way adjustable hinges. “Up or down”, “side to side” and “in and out” adjustments are shown
in the image below.
1
2
alignment screws
tornillos para alineamiento
drawer front
frente del cajón
2
1
6