
Instructions / Assembly


DESIGN TIPS
When installing a wall cabinet next to a tall cabinet, a filler is recommended (not included). This will
help prevent the wall cabinet door from rubbing on the side of the tall cabinet.
CONSEJOS DE DISEÑO
Al instalar un gabinete de pared al lado de otro alto, se recomienda usar un relleno (no incluido). Esto evitará que la puerta
del gabinete de pared roce el lateral del gabinete alto.
STEP 1
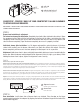
Prepare for cabinet installation. Remove base boards and other objects on the wall area where
cabinets are to be installed. Using a straight edge and a level, find the high point in the floor where the
boxes are to be installed. From the high point, mark a level horizontal line on each wall where the
cabinets will be attached. Mark another horizontal line 34.5" above the horizontal base line. This line
will indicate the height of all base cabinets. From those lines, mark another horizontal line 54" up for
the bottom of wall cabinets and mark another line that represents the top of the wall cabinets.
PASO 1
Preparación para instalación. Retira las tablas de base y otros objetos del área de la pared donde se instalarán los
gabinetes. Con escuadra y nivel, busca el punto alto del piso donde se instalarán las cajas. Desde el punto alto, marca una
línea horizontal nivelada en cada pared donde se fijarán los gabinetes. Marca otra línea horizontal a 87.6 cm por encima
de la línea base horizontal. Esta línea indicará la altura de todos los gabinetes de base. Desde esas líneas, marca otra línea
horizontal a 1.4 m por encima de la parte inferior de los gabinetes de pared y marca otra línea más que indique la parte
superior de los gabinetes de pared.
STEP 2
Hanging rail installation. Position the base of the wall hanging rail 6
3
⁄8" below the upper most
marked horizontal line. When installing the wall hanging rail, make sure the angle cut is facing the wall
(see illustration). Pre-drill through the wall hanging rail into the wall studs with the
3
⁄32" drill bit
approximately 2" deep. Screw the wall hanging rail to the wall with 10x 2-½" washer head cabinet box
installation screws (not included) while making sure the wall hanging rail is level. Shim where
necessary to keep the wall hanging rail level and plumb. Note: cabinets 12" – 24" wide have two
available hanging rails, which allows for the option to choose the door opening orientation. The wall
hanging rail assists in installation. Each cabinet itself must be screwed to the wall. Ensure all hanging
rails are level to adjacent and previous hang rail.
PASO 2
Instalación del riel para colgar. Coloca la base del riel para colgar en la pared a 16.19 cm por debajo de la línea horizontal
marcada más alta. Al instalar el riel para colgar en la pared, asegúrate de que el corte angular mirando hacia la pared (ver
imagen). Pre-taladra, a través del riel para colgar en pared, hacia dentro de los barrotes de pared con una broca de
3
⁄32 plg
hasta unos 5.1 cm de profundidad. Atornilla a la pared el riel para colgar con los tornillos (no incluidos) de 10 x 2-½ plg
y cabeza de arandela que se usan para instalar cajas de gabinete, asegurando que el riel quede nivelado. Usa cuñas donde
sea necesario para mantener el riel nivelado y a plomo. Nota: los gabinetes de 30.5 cm a 61 cm de ancho tienen
disponibles dos rieles para colgar y esto permite elegir la dirección en que abrirá la puerta. El riel para colgar en pared
sirve de ayuda durante la instalación. Cada gabinete tiene que atornillarse a la pared. Asegúrate de que todos los rieles
para colgar estén al mismo nivel de los rieles adyacentes y previamente colgados.
34.5"
87.6cm
2
1
2
3
4
3
1
3
4
4
54"
1.4m
height of all base cabinets
altura de todos los gabinetes base
horizontal base line
línea horizontal de base
use level to find the highest leveled point
utilice nivel para encontrar el punto más alto
horizontal wall line
línea horizontal de pared