
Instructions / Assembly


5 HAMPTONBAY.COM
Please contact 1-855-HD-HAMPTON for further assistance.
Installation
1
Attaching the mounting bracket to the
junction box
□ Remove the preinstalled ball nuts from the mounting unit
(AA) and place them in a safe location.
□ Attach mounting unit (AA) to the junction box (not included)
with mounting screws (BB).
NOTE: The preinstalled support screws on the mounting
unit (AA) should protrude out away from the junction box
with approximately 1/8 in. of adjustability.
BB
AA
2
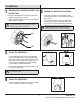
Making the electrical connections
□ Connect the copper wire on the light xture (A) to the
mounting bracket (AA) by securing it with the preinstalled
ground screw.
□ Connect the black to black (power), the white to white
(neutral) and copper wire to ground wire with the wire
nuts(CC) and secure with electrical tape (not included).
NOTE: If the wires from the xture are the same color,
attach the side with markings or letters to the black
(positive) wire and the other to the white (neutral) wire.
CC
3
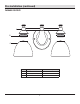
Secure the light xture
□ Secure the light xture (A) to the junction box by placing
it over the preinstalled screws on the mounting unit (AA)
and securing it with the previously removed ball nuts. If the
xture is not secure to the wall and is sagging, continue
to turn the ball nuts. This will back out the preinstalled
screws and allow for additional adjustment.
□ Remove the preinstalled socket ring (B), add shade (C) and
re-secure the socket ring (B).
NOTE: Light xture (A) can be installed with the socket
facing either up or down.
A
C
B
4
Secure the light xture
□ Install two 60-watt max. medium- base incandescent bulbs
or two 13-watt max. CFL bulbs (none included).