
Instructions / Assembly


Figure
H MPTONBAY.COM
Assembly
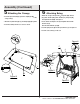
Attaching the
Please contact 1-855-HD-HAMPTON for further assistance.
□
□
5
6
7
Canopy
Attaching w ing
S
M
L
F
Figure
10
□
□
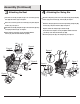
Insert the top beam bent pipe (L) and the straight pipe (M)
canopy cloth (F).
Attach the top beam bent pipe (L) and straight pipe (M) together.
Insert the assembly into the four corners as shown.
Attach the canopy to the top beam ( ) using bolts (AA), washers
(FF), plastic washers (OO), plastic washers (PP), wing nuts (RR),
and adj ustment knob (QQ). See Figure 11.
Ensure all bolts are aligned correctly and tighten the bolts with
the wrench (SS).
Cover the bolts with bolt caps (KK).
Insert the spring hooks (O) into the top beam holes ( ). See Figure 12.
□
□
Place the seat cushion (P) on the seat.
12
Figure
O
(Continued)
FF
OO
AA
KK
QQ
PP
RR
P
13
Figure
11
F
A
to the
J
J
J