
Installation Guide


26
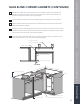
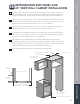
Wallllersareavailabletollgapsbetweentheendofarowofcabinetsanda90°wall.
Tomarkthewallllerandbackerboardpositions,runalevelacrossthespacebetween
the wall and the closest cabinet. On the wall, mark behind the level. Draw a straight,
verticallinefromthismarkusingalevel.Alignthefrontofthelleronthismark.Mark
behindthellerforthefrontpositionofthebackerboard.
Attach the backer board to the wall so it is plumb. Be sure that the backer board is wide
enough to be fastened to the nearest wall stud.
Place,shim,levelandinstallthenalcabinet.Withthenalcabinetinplace,measurethe
gap between the wall and the top of the cabinet.
Ifthewallcontouriseven,usethisdimensiontomarkandcuttheller.
Ifthewallcontourisirregular,you’llneedtoscribethesurfaceoftheller.
Clampthellertotheadjacentcabinetsotheedgesareexactlyaligned.Setaprotractor
compasstotheexactwidthoftheller.
INSTALLER NOTE: A backer board is required behind the wall ller if the
ller is wider than 3". Attach the backer board to the wall before installing
the nal cabinet.
GENERAL INFORMATION INSTALLATION REQUIREMENTSPRE-INSTALLATION INSTALLATION
12
WALL FILLER; BASE, WALL
Front Base Cabinet Line
Toekick Backer Block
Filler Thickness
Backer Board Placement
Level
Front Line