
Instructions / Assembly


Page 8
INSTALLATION & ASSEMBLY (cont.):
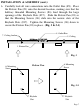
7. Secure the Acrylic Lens (#2) and Frame (#3) to the Fixture Pan (#1)
using the Thumb Nuts (#4), as shown. (Fig. 4)
8. Installation is complete. Turn on power at the circuit breaker or fuse
box. Turn the light switch on to activate the fixture.
1. Fixture Pan
3. Frame
2. Acrylic Lens
4. Thumb Nuts
Fig. 4