
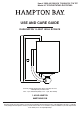
Instructions / Assembly


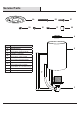


Installation (continued)
C
A
B
C
GG
6
□ Place the canopy of the xture body (C) over the outlet box, and ensure the heads of the support screws (long) (BB) come through the
holes of back of the xture body (C).
□ Tighten the cap nuts (GG) onto the protruding support screws (long) (BB) on the mounting bracket (AA) until the xture body (C) is held
rmly against the wall.
□ There are two installation options to choose from.
Installation Option 1:
Up light
Installation Option 2:
Down light
□ Unscrew the socket ring (A) from the socket on the xture body
(C), and attach the glass shade (B) onto the socket on the xture
body (C), and secure the glass shade (B) with the socket ring (A).
□ Install the light bulb (not included) into the socket. Use one 60-
watt medium base (E26) type A bulb or less.
4
Installing the xture body to the outlet box
5
Installing the glass shade and light bulb
BB
AA
NOTE: You can also use one 9W maximum medium
base (E26) self-ballast LED bulb (sold separately). Do not
exceed the recommended wattage.