
Instructions / Assembly


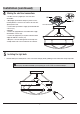
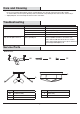


Table Of Contents

Installation
5
□
3
Test Fitting Ceiling Canopy to Crossbar Assembly
Installing the Crossbar Assembly
AA
AA
A
B
BB
2
Installing the Cage
1
□
□
□
□
Remove mounting balls from the crossbar assembly (AA).
Fit the ceiling canopy to the crossbar assembly (AA) and secure with mounting balls.
Note: The ceiling canopy should be snug against the ceiling and the mounting balls.
If not, adjust the length of the mounting screws on the crossbar assembly by unscrewing the preassembled hex nuts.
Then, screw the mounting screws in or out of the crossbar until the desired length is achieved.
Once the ceiling canopy is secure, remove the mounting balls and ceiling canopy and proceed to Step 4.
Secure the crossbar (AA) to the outlet box (not included)
with outlet box screws (BB). Tighten until snug.
□
□
□
Unfold support arms of the xture body (A) to proper
locations. (Refer to Arm Orientation)
Remove mounting screw from the arm.
Conrm that the holes on the cage (B) align with the mounting
holes on the arm. Pass mounting screws through hole of the
cage (B) and thread into the mounting holes on the arm.
Hand-tighten until snug.
NOTE: The preassembled mounting screws on the
crossbar should protrude outward.
Arm Orientation
Mounting Screw
Mounting Balls