
Use and Care Manual

3
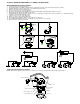
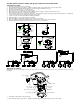
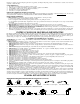
Proper alignment
of notches
Wire mounting clip
Lens cover
Trim
Surface can
Surface Can Notch
Short mounting screws
L
ong mounting screws
P
lug
INSTALLATION
INSTRUCTIONS
(AS SHOWN IN DIAGRAM)
:
RECESSED MOUNT INSTALLATIONS:
1. Locate desired position for cabinet light.
2. For cabinet light kit – Install the touch dimmer (no transformer needed) on the desired locations where you like.
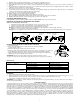
3. Install the plug at the end of the fixture wire. (See detailed instructions below)
4. Drill a 2-3/8” inch hole in the desired location.
5. Do not use surface can for recessed applications.
6. Place the gasket and the mounting bracket as per diagram and install the mounting bracket with two (2) screws.
7. Route plug wire through hole and push light into hole.
8. Install the bulb into the lamp housing. Note: It is best to align bulbs in same direction in kit set with the V of the filament facing
outwards to assist with the dissipation of heat.
9. Screw the lens cover clip on the lamp trim.
10. Repeat procedures 1-9 for each light in the kit.
11. For a single light installation, plug the corded plug into a receptacle.
12. For a multi-light installation using one receptacle, use the provided 3 way receptacle.
13. Restore the power and turn on the switch.
SURFACE MOUNT INSTALLATIONS:
NOTE: Wire must be aligned with notch in top of surface can to ensure proper alignment with housing and polarization.
2
1
Gasket
3
2.36
″
4
Mounting
bracket
Mounting
screws
Plug