
Use and Care Manual

4
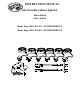
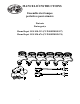
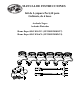
Bulb
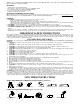
1. Locate desired position for cabinet light.
2. For cabinet light kit – Install the touch dimmer (no transformer needed) on the desired locations where you like.
3. Install the plug at the end of the fixture wire. (See detailed instructions below)
4. Remove the lens cover from housing by turning counter clockwise.
5. Route the plug wire through the surface can notch. Be sure to install the surface can so that notch faces rear of cabinet.
6. Mount surface can with the two (2) short screws provided. Then insert the lamp housing into the surface can with the notches on the
side of the lamp housing aligning with the notches on the surface can.
7. Use the three (3) long mounting screws provided to secure.
8. Install the bulb into the lamp housing. Note: It is best to align bulbs in same direction in kit set with the V of the filament facing
outwards to assist with the dissipation of heat.
9. Screw the lens cover clip on the lamp trim.
10. Repeat procedures 1-9 for each light in the kit.
11. For a single light installation, plug the corded plug into a receptacle.
12. For a multi-light installation using one receptacle, use the provided 3 way receptacle.
13. Restore the power and turn on the switch.
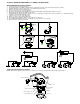
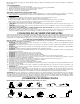
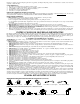
HOW TO IDENTIFY THE WIRES:
The NEUTRAL WIRE has parallel ridges, while the HOT WIRE is smooth with markings (printed words).
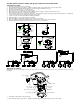
HOW TO INSTALL THE PLUG ENDS (Use only with wire type SPT-2)
1. Determine the length of each fixture wire and cut to length with scissors or wire cutters.
2. Slide open the plug cover. (See detailed diagrams below)
3. Connect the hot wire and neutral wire into the plug as per diagram.
Note: Neutral wire must be connected to the conductive sharp points closest to the wider blade of the plug.
4. Slide the plug cover back in place to complete the installation.
Note: The force of the plug cover pressing down on the wire will ensure that the wire is pierced by the electrical conductor points. Use
caution.
RELAMPING INSTRUCTIONS:
1. Unplug the unit.
2. Remove the lens cover by turning counter clockwise
and pulling it away from the unit.
3. Remove old bulb by pulling the bulb straight out in a horizontal direction.
4. Insert new bulb into socket using a tissue or soft cloth with the V of the filament
facing outwards. (Oil from the skin may damage bulb.)
5. Replace lens cover by aligning tabs on cover with flat areas on reflector.
Turn until cover locks into place.
CAUTION: Risk of fire! Use 20 watt or smaller, 120 Volt, type T-4 G8 base,
Xenon or Halogen bulbs. Don’t use Low voltage (12 volt) bulbs in these fixtures.
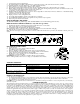
TROUBLE SHOOTING:
PRODUCT MAINTENANCE:
1. Turn off power to the light fixture.
2. To clean the fixture, first disconnect power to the fixture by turning off the circuit breaker or by removing the fuse at the fuse box. Next, use a
dry or slightly dampened clean cloth (use clean water, never use a solvent) to wipe the inside glass and interior surface of the fixture.
3. Allow the fixture to dry completely before power is restored.
CAUTION: Do not use chemical solvents or harsh abrasives to clean fixture as damage to the fixture or various components may occur remedying
the fixture inoperable.
LIMITED WARRANTY
The manufacturer warrants this lighting fixture to be free from defects in materials and workmanship for a period of five (5) years from date of
purchase. This warranty applies only to the original consumer purchaser and only to products used in normal use and service. If this product is found
to be defective, the manufacturer’s only obligation, and your exclusive remedy, is the repair or replacement of the product at the manufacturer’s
discretion, provided that the product has not been damaged through misuse, abuse, accident, modifications, alterations, neglect or mishandling. This
warranty shall not apply to any product that is found to have been improperly installed, set-up, or used in any way not in accordance with the
instructions supplied with the product. This warranty shall not apply to a failure of the product as a result of an accident, misuse, abuse, negligence,
alteration, or faulty installation, or any other failure not relating to faulty material or workmanship. This warranty shall not apply to the finish on any
portion of the product, such as surface and/or weathering, as this is considered normal wear and tear. The manufacturer does not warrant and
specially disclaims any warranty, whether express or implied, of fitness for a particular purpose, other than the warranty contained herein. The
manufacturer specifically disclaims any liability and shall not be liable for any consequential or incidental loss or damage, including but not limited
to any labor/expense costs involved in the replacement or repair of said product.
Problem Possible Cause Corrective Action
1. Light bulb is burned out. 1. Replace light bulb.
2. Power is off. 2. Make sure power supply is on.
3. Faulty wire connection. 3. Check wiring.
Light Bulb will not illuminate.
4. Faulty switch. 4. Test or replace switch.
Fuse blows or circuit breaker trips
when light bulb is illuminated.
Crossed wires or power wire is grounding
out.
Check wire connections.
4
5
Pl
u
g cover
Connect to
hot wire
Pl
u
g cover
Connect to
Neutral wire
Hot wire
N
eutral wire