
Use and Care Manual


INSTALLATION
1. Make sure main power is OFF.
2. Install mounting bracket to existing outlet box with screws.
3. Pull wires through mounting bracket.
A. Make ELECTRICAL CONNECTIONS as
directed above.
B. Carefully tuck connected wires back into the outlet box.
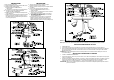
4. A. Secure the canopy to the mounting bracket with
provided decorative nuts(Diagram 1).
B. Install the canopy to the mounting bracket with provided
screws (Diagram 2).
C. Install the canopy by threading the nut onto the mounting
bracket stem. Place the decorative nut onto the end of
the mounting bracket stem.(Adjust the length of the stem
if necessary.) (Diagram 3).
INSTALACIÓN
1. Antes de iniciar la instalación, asegúrese de que la
alimentación eléctrica esté desconectada.
2. Instale el soporte de montaje en la caja de empalme existent
e
con tornillos.
3. Pase los cables a través del soporte de montaje.
A. Haga las CONEXIONES ELÉCTRICAS como se
explica más arriba.
B. Vuelva a colocar con cuidado todos los cables conectados
adentro de la caja de empalme
4. A. Fije la pabellon al soporte de montaje con los tuercas
decorativa provistos.(Diagrama 1)
B. Fije la pabellon al soporte de montaje con los tornillos
provistos. (Ddiagrama 2)
C. Fije la pabellon enroscando la tuerca en el vástago del
soporte de montaje.Coloque la tapa decorativa en el
extremo del vástago del soporte de montaje.(Ajuste la
longitud del vástago cuando sea necesario) .(Ddiagrama 3)
Note: Some fixture shapes may vary, not shown for all models.
Nota: Algunas formas del cabezal del riel pueden variar y no se muestran las correspondientes a todos los modelos.
INSTALLATION AND REMOVAL OF BULB
1. TURN POWER OFF.
2. To insert bulb, align the 2 poles on the bulb to the socket holes. Rotate the bulb until it is secured.(See diagram).
3. Removal of bulb: Hold the fixture with one hand and place the re-lamping tool (not provided for all models) on the light bulb
lens and press firmly. Rotate the bulb counterclockwise until it can be removed from the socket. Replace with new bulb
following step #2 above.
CAUTION: Refer to the re-lamping label located near the lamp holder for recommended maximum wattage. Do not exceed
recommended wattage.
INSTALACIÓN Y REMOCIÓN DE LA LÁMPARA
1. CORTE LA ALIMENTACIÓN ELÉCTRICA.
2. Para insertar la lámpara, alinee los 2 polos de la misma con los orificios del portalámpara. Gire la lámpara hasta que quede
sujeta. (Vea el diagrama).
3. Remoción de la lámpara: Stenga el artefacto con una mano, coloque la herramienta especial (No se suministra en todos los
modelos) de cambio de bombilla sobre el cristal de la bombilla y haga presión firmemente. Gire la bombilla en sentido
antihorario hasta que se suelte del portalámpara. Coloque la nueva bombilla según el paso 2 precedente.
PRECAUCIÓN: Observe el valor máximo de potencia de lámpara recomendado en la etiqueta del portalámpara. No exceda la
potencia recomendada.