INSTRUCTION MANUAL 2LT Interior Flushmount The Home Depot SKU 504-459 (UPC 725916815547) Page 1
Thank you for purchasing this Hampton Bay interior flushmount. This product has been manufactured with the highest standards of safety and quality. FEATURES: 1. Two-light interior flushmount in pewter finish with frosted glass. 2. This fixture has been engineered to safely use two 60 watt medium base incandescent light bulbs (do not exceed 60 watts each) (not included). 3.
CAUTION: 1. Before starting installation of this fixture or removal of a previous fixture, disconnect the power by turning off the circuit breaker or by removing the fuse at the fuse box. 2. CONSULT A QUALIFIED ELECTRICIAN IF YOU HAVE ANY ELECTRICAL QUESTIONS. 3. If you have any non-electrical questions about this fixture, please contact our Customer Service Team at 1-877-527-0313 or visit www.homedepot.com. Please reference your SKU 504-459 or UPC 725916815547. 4.
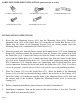
PARTS INCLUDED FOR ASSEMBLY (parts are not to scale): 1ea Hex Nut (#5) 1ea Bottom Cover (#8) 1ea Nipple (#6) 1ea Shade (#7) 1ea Finial (#9) ASSEMBLY INSTRUCTIONS: 1. Carefully unpack the fixture. Lay out all parts on a clean surface. 2. Unscrew the Finial (#9) from the Nipple (#6). Screw the Nipple (#6) into the Bushing (#2). Tighten the Hex Nut (#5) against the Bushing (#2) to secure the Nipple (#6). 3. Before continuing Assembly, please proceed to the Installation Instructions. 4.
ASSEMBLY: Page 5
PARTS INCLUDED FOR INSTALLATION (parts are not to scale): 3ea Wire Connectors (#12) 1ea Ground Screw (#15) 2ea Outlet Box Screws (#13) 1ea Mounting Strap (#14) 2ea Mounting Screws (#16) INSTALLATION INSTRUCTIONS: 1. Screw the two Mounting Screws (#16) into the Mounting Strap (#14). Mount the Mounting Strap (#14) to the Outlet Box (#11) using the two Outlet Box Screws (#13).
INSTALLATION: Page 7
TROUBLESHOOTING: Problem Light bulb will not illuminate. Fuse blows or circuit breaker trips when light bulb is illuminated. Possible Cause 1. Light bulb is burned out. 2. Power is off. 3. Faulty wire connection. 4. Faulty switch. Crossed wires or power wire is grounding out. Corrective Action 1. Replace light bulb. 2. Make sure power supply is on. 3. Check wiring. 4. Test or replace switch. Check wire connections. PRODUCT MAINTENANCE: 1.
MANUAL DE INSTRUCCIONES Plafon de 2 Luces para Interiores The Home Depot SKU 504-459 (UPC 725916815547) Page 9
Gracias por comprar este plafón para interiores Hampton Bay. Este producto ha sido manufacturado con los estándares de seguridad y calidad más altos. CARACTERÍSTICAS: 1. Plafón para interiores de dos luces en acabado de estaño con cristal escarchado. 2. Esta instalación ha sido diseñada para usar con seguridad dos bombillas de luz incandescente de base medio de hasta de 60 vatios (no exceder de 60 vatios cada una) (no incluido). 3.
PRECAUCIÓN: 1. Antes de comenzar la instalación o de quitar la instalación anterior, desconecte la alimentación apagando el interruptor del circuito o quitando el fusible en la caja de fusible. 2. POR FAVOR CONSULTE CON UN ELECTRICISTA CUALIFICADO SI TIENE CUALQUIER PREGUNTA ELÉCTRICA. 3. Si tiene cualquier pregunta no eléctrica sobre esta instalación, por favor contacte con nuestro Equipo de Atención al Cliente en el 1-877-527-0313 o visite www.homedepot.com.
PARTES INCLUIDAS PARA EL MONTAJE (las partes no están en proporción de escala): 1ea Tuerca Hexagonal (#5) 1ea Cubierta Inferior (#8) 1ea Entrerrosca (#6) 1ea Pantalla (#7) 1ea Embellecedor (#9) INSTRUCCIÓN DE ASAMBLEA: 1. Desempaquetar cuidadosamente la instalación, disponer todas las piezas sobre una superficie límpia. 2. Desatornillar el Embellecedor (#9) de la Entrerrosca (#6). Atornillar la Entrerrosca (#6) en el Buje (#2).
ASAMBLEA: Page 13
PARTES INCLUIDAS PARA EL INSTALACIÓN (las partes no están en proporción de escala): 3ea Conectores de Cables (#12) 1ea Tornillo de Toma de Tierra (#15) 2ea Tornillos de la Caja de Salida (#13) 1ea Correa de Montaje (#14) 2ea Tornillos de Montaje (#16) INSTRUCCIONES PARA LA INSTALACIÓN: 1. Atornille los dos Tornillos de Montaje (#16) en la Correa de Montaje (#14). Monte la Correa de Montaje (#14) a la Caja de Salida (#11) usando los dos Tornillos de la Caja de Salida (#13).
INSTALACIÓN: Page 15
SOLUCIÓN DE PROBLEMAS: Problema La bombilla no se enciende. Cuando se enciende la luz, el fusible se quema o el interruptor de circuito se dispara. Causa posible Acción Correctiva 1. La bombilla está quemada. 1. Reemplace la bombilla. 2. Compruebe si hay 2. No hay alimentación. suministro de electricidad. 3. La conexión de los cables 3. Inspeccione el cableado. no es la correcta. 4. El interruptor está 4. Pruebe o reemplace el defectuoso. interruptor.
MANUEL D'INSTRUCTIONS Plafonnier d'Intérieur 2LP The Home Depot UGS 504-459 (UPC 725916815547) Page 17
Nous vous remercions d'avoir acheté ce plafonnier d'intérieur Hampton Bay. Ce produit a été fabriqué en respectant les plus hauts standards de sécurité et de qualité. CARACTERISTIQUES: 1. Plafonnier d’intérieur à deux lumières au fini étain brossé avec un verre givré. 2. Ce luminaire a été conçu pour utiliser sûrement jusqu'à deux ampoules incandescentes à culot moyen de 60 watts (ne pas dépasser 60 watts chacune) (non incluses). 3.
AVERTISSEMENT: 1. Avant de commencer à installer ce luminaire ou d'enlever l'ancien luminaire, déconnectez le courant en éteignant le disjoncteur ou en enlevant le fusible correspondant du coffret à fusibles. 2. CONSULTER UN ELECTRICIEN QUALIFIE QUESTION RELATIVE A L'ELECTRICITE. POUR TOUTE 3. En cas de questions non relatives à l'électricité à propos de ce luminaire, veuillez contacter notre centre de Service à la Clientèle au 1-877-527-0313 ou visiter www.homedepot.com.
PIECES INCLUSES POUR L'ASSEMBLAGE (les pièces ne sont pas à l'échelle): 1x Écrou Hexagonal (#5) 1x Capuchon Inférieur (#8) 1x Manchon Fileté (#6) 1x Abat-jour (#7) 1x Écrou Décoratif (#9) INSTRUCTIONS D'ASSEMBLAGE: 1. Déballer soigneusement le luminaire. Placer toutes les pièces sur une surface propre. 2. Dévisser l'Ecrou Décoratif (#9) du Manchon Fileté (#6). Visser le Manchon Fileté (#6) sur la Bague (#2). Visser l'Ecrou Hexagonal (#5) sur la Bague (#2) pour maintenir l'Manchon Fileté (#6). 3.
ASSEMBLAGE: Page 21
PIECES INCLUSES POUR L'INSTALLATION (les pièces ne sont pas à l'échelle): 3x Serre-Fils (#12) 1x Vis de Terre (#15) 2x Vis Boîte de Sortie (#13) 1x Sangle de Montage (#14) 2x Vis de Montage (#16) INSTRUCTIONS D'INSTALLATION: 1. Visser les deux Vis de Montage (#16) sur la Sangle de Montage (#14). Fixer la Sangle de Montage (#14) sur la Boîte de Sortie (#11) grâce aux deux Vis de Boîte de Sortie (#13).
INSTALLATION: Page 23
SOLUTIONS DE DEPANNAGE: Problème L'ampoule ne s'allume pas. Le fusible saute ou le disjoncteur disjoncte lors de l'allumage. Cause Possible 1. L'ampoule est grillée. 2. Le courant est coupé. 3. Mauvaise connexion de fil. 4. Interrupteur mural défectueux. Mauvaise connexion des câbles ou mise à terre défectueuse. Mesure Corrective 1. Remplacez l'ampoule. 2. Vérifiez si le courant est sous tension. 3. Vérifiez le câblage. 4. Testez ou remplacez l'interrupteur. Vérifiez les connexions des câbles.