
Instructions / Assembly


Page 6
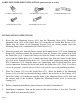
PARTS INCLUDED FOR INSTALLATION (parts are not to scale):
3ea Wire Connectors (#12)
2ea Outlet Box Screws (#13) 1ea Mounting Strap (#14)
1ea Ground Screw (#15) 2ea Mounting Screws (#16)
INSTALLATION INSTRUCTIONS:
1. Screw the two Mounting Screws (#16) into the Mounting Strap (#14). Mount the
Mounting Strap (#14) to the Outlet Box (#11) using the two Outlet Box Screws (#13).
[Make sure the heads of the Mounting Screws (#16) are facing outside when the
Mounting Strap (#14) is attached to the Outlet Box (#11).]
2. Wrap the ground wire from the fixture around the Ground Screw (#15) on the Mounting
Strap (#14), and then connect the ground wire from the fixture to the ground wire from
the Outlet Box (#11). Connect the white wire from the fixture to the white wire (neutral
wire) from the Outlet Box (#11). Connect the black wire from the fixture to the black
wire (live wire) from the Outlet Box (#11). Cover the three connections using the three
Wire Connectors (#12). Wrap the three wire connections with electrical tape for a more
secure connection. Position the wires back inside the Outlet Box (#11). Note: If you have
electrical questions, consult your local electrical code for approved grounding methods.
3. Place the Canopy (#1) over the Outlet Box (#11). Allow the heads of the Mounting
Screws (#16) to come out through the large ends of the keyholes on the Canopy (#1).
Twist the Canopy (#1)
clockwise
until the heads of the Mounting
Screws (#16) slide into
the
narrow ends of the keyholes. Tighten
the
Mounting Screws (#16) to secure the
Canopy (#1).
4. Before completing Installation, please return to Assembly Instruction #4.
5. Installation is complete. Turn on the power at the circuit breaker or fuse box. Turn the
light switch on to activate the fixture.