
Installation Guide
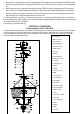

5. Connect chain (14) with Canopy Loop (15) and hanging loop (12) together. Adjust the chain length as needed. Thread
Fixture wire (6) and ground wire (3) through the chain (14), ring (13), hanging loop (12), canopy (11) and threaded tube
(9).
6. Attach the ground wire (3) under the ground screw (5) marked “GND”, and fasten the ground screw (5) to the ground
wire (3) until secure. Connect black/smooth fixture wire to black supply wire and white/ribbed fixture wire to the white
supply wire using wire connectors (2) provided. Connect the fixture ground wire (3) and the house ground wire using
wire connectors (2) provided. Place wiring back in the junction box.
7. Place the Canopy (11) and ring (13) and onto the Junction box (1). Spin ring (13) onto hanging loop (12) until secure.
Note: According to your specific needs, you can adjust the length of threaded tube (9) by screwing it into the mounting plate
(4). And then Screw hex nut (7) to fasten it.
8. Screw bulb (10) into the socket (31).
ELECTRICAL CONNECTIONS
Required Supply Circuit: 120V, 60Hz
Connect the white wire(s) from the fixture to the white wire of the supply circuit. Connect the black wire(s) from the fixture to the black
wire of the supply circuit. Connect the green or bare copper wire to the ground wire of the supply circuit. Use UL/CSA listed wire
connectors suitable for the size type, and number of conductors. No loose strands or loose wires should be present. Secure wire
connectors with UL/CSA listed electrical tape.
1. Junction box
2. Wire connector
3. Ground wire
4. Mounting plate
5. Ground screw
6. Fixture Wire
7. Hex nut
8. Washer
9. Threaded tube
10. Machine Screw
11. Canopy
12. Hanging loop
13. Ring
14. Chain
15. Canopy Loop
16. Ball
17. Hex Screw
18. Hex Wrench
19. Steel Wire
20. Iron Bar
21. Center Column
22. Threaded tube
23. Glass Shade
24. Tube
25. Cluster Assembly
26. Hex. Nut
27. Threaded Tube
28. Cup
29. Finial
30. Bulb
31. Socket