
Use and Care Manual


2
Thank you for purchasing this Hampton Bay interior pendant fixture. This product has been manufactured
with the highest standards of safety and quality.
FEATURES:
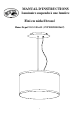
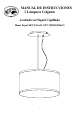
1. 120 volt, 83 in. pendant with brushed nickel finish and hardback lace shade.
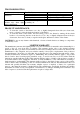
2. Uses 1, 120 volt, 100 Watt MAX, standard (A19), incandescent light bulb or CFL equivalent (bulbs
not included).
3. Can be used with any standard, 120 volt, incandescent style dimmer switch (not included).
QUESTIONS, PROBLEMS, MISSING PARTS:
Before returning to your local Home Depot, please call our Customer Service Team at 1-877-527-0313 or
visit www.homedepot.com. Please reference your SKU 530-635 or UPC 008938102667.
IMPORTANT SAFETY INSTRUCTIONS
INSTALLATION INSTRUCTIONS PERTAINING TO RISK OF FIRE OR INJURY TO PERSONS
1. Read all instructions.
2. Do not install this lighting system in wet locations.
3. CAUTION - When the light is on, the lamp is HOT!
4. CAUTION - Hot surface. Keep away from curtains and other combustible materials.
5. Turn off/unplug and allow to cool before replacing bulb (lamp).
6. All electrical connections must be in accordance with local codes and the National Electrical Code. If
you are unfamiliar with methods of installing electrical wiring, secure the services of a qualified
licensed electrician.
7. This fixture is intended to be mounted to a 4in. square x 2-1/8in. deep metal octagon outlet box. The
box must be directly supported by the building structure.
8. Before starting the installation, disconnect the power by turning off the circuit breaker or by removing
the appropriate fuse at the fuse box. Turning the power off using the light switch is not sufficient to
prevent electrical shock.
SAVE THESE INSTRUCTIONS
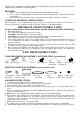
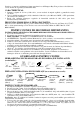
TOOLS REQUIRED FOR ASSEMBLY & INSTALLATION (not included):
Bulb Safety Goggles Ladder Gloves Wire Strippers Flathead Phillips Electrical tape
Screwdriver Screwdriver
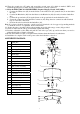
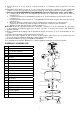
PARTS INCLUDED FOR ASSEMBLY (parts are not to scale):
(2)Outlet Box (3)Wire Shade (#12) Decorative Glass Plastic (3)Decorative
Screws (#8) Connectors (#2) ring (#16) lens (#17) washer (#18) nut (#19)
ASSEMBLY INSTRUCTIONS:
1. Carefully unpack the fixture and lay out all of the parts.
2. Unscrew the Socket Ring (#13) from the bulb socket assembly (#11).
3. Place the Shade (#12) over the bulb socket assembly (#11).
4. Screw the Socket Ring (#13) back onto the bulb socket assembly (#11) to secure the Shade (#12) in
place.
5. Install 1, standard A19 incandescent, 100 watt MAX light bulb (#14) or equivalent CFL bulb in the
bulb socket assembly (#11).
Caution: Refer to the re-lamping label near the lamp holder for recommended wattage.
6. Place the Decorative ring(#16) onto the shade(#12) , then place the Glass lens(#17) onto the Decorative
ring(#16), To align the three holes of the Glass lens(#17) and decorative ring(#16) thread onto the
screws(#15) of the shade(#12) and tightening together in place with the decorative nuts(#19) and
plastic washer(#18) provided.
7. Make sure the main power t o the circuit is OFF.
8. Loosen the canopy screw(#9) separately the mounting strap(#4) from the canopy assembly(#10).
9. Attach the Mounting Strap (#4) to the Outlet Box (#1) using the two Outlet Box Screws (#8) provided.