
Installation Guide
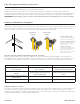
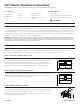


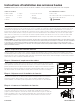
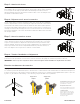
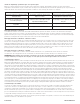
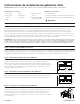
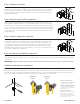
Table Of Contents

10/15/2023 A5170-FRE-Rev 1
Instructions d'installation des armoires hautes
ATTENTION: N'utilisez jamais de clous pour monter des armoires. L'utilisation de clous peut annuler votre garantie d'usine, écrite ou implicite.
Avant de commencer l'installation
Ces instructions sont destinées à servir de référence supplémentaire pour ceux qui possèdent les compétences et l'expérience appropriées
pour installer des armoires en toute sécurité et avec succès, y compris une connaissance des principes de base de la menuiserie et une
utilisation sûre et appropriée des outils. La charpente et la construction des murs peuvent varier considérablement et ces instructions
peuvent ne pas décrire toutes les méthodes de construction. De plus, il peut y avoir des conduites d'électricité, de plomberie, de gaz ou
d'autres services publics derrière le mur, pour lesquels tout contact doit être évité lors de l'installation. Si, pour une raison quelconque,
après avoir lu ces instructions, vous n'êtes pas sûr de votre capacité à installer cette armoire avec succès et en toute sécurité, veuillez
contacter un entrepreneur agréé pour l'installation. MasterBrand Cabinets n’est pas responsable d’une mauvaise installation ou de
dommages matériels.
AVERTISSEMENT:Les conduites d'électricité, de plomberie, de gaz et autres services publics sont fréquemment installés ou encastrés derrière les murs
où les armoires sont installées. Avant de percer des trous ou d'enfoncer des vis, assurez-vous que vous n'entrerez en contact avec aucun de ces utilitaires.
Le non-respect de ces instructions peut entraîner des dommages matériels et des blessures graves, voire mortelles. Si vous n'êtes pas sûr de votre
capacité à garantir que vous n'entrerez pas en contact avec les services publics derrière un mur pendant l'installation, veuillez contacter un entrepreneur
agréé pour installer les armoires.
Étape 1 : Inspection des nouvelles armoires
Toutes les armoires sont soumises à des contrôles de qualité avant de quitter l'usine et ont été soigneusement emballées pour éviter
tout dommage pendant le transport et la manutention. Malheureusement, des dommages peuvent survenir occasionnellement lors de la
manutention entre l'usine et la destination nale. Inspectez soigneusement chaque armoire. Si des dommages sont découverts, remettez
l'armoire dans le carton et informez le détaillant de l'achat.
Étape 2: Déterminer l’emplacement du cabinet
Retirez les plinthes et autres objets sur la zone du mur où les armoires doivent être installées. À l’aide
d’une règle droite et d’un niveau, trouvez le point haut du sol où les armoires doivent être installées. À
partir du point haut, tracez une ligne horizontale de niveau sur chaque mur où les armoires seront xées.
À partir des lignes de niveau, marquez une autre ligne horizontale parallèle de 84po pour les hauteurs
des armoires hautes. Le haut des armoires de base, hautes et murales sera situé à ces marques.
Étape 3 : Préparez-vous à l'installation de l'armoire
Localisez les montants avec un détecteur de montants et marquez l'endroit où les armoires
doivent être installées. Retirez toutes les portes, tiroirs et étagères réglables des armoires
avant l'installation. Cela réduira le poids et permettra un accès plus facile lors de l'installation.
Étape 4 : Commencer l'installation de l'armoire
Commencez à installer les armoires inférieures dans le coin (le cas échéant). Suivez les
instructions du meuble bas et avancez vers le meuble haut. À l’aide de pinces, alignez et
joignez les armoires adjacentes au niveau des cadres avant. Assurez-vous que les cadres du
visage sont alignés à la fois sur le visage et verticalement. Avec un foret de 3∕32", percez des
trous de départ à travers les cadres de façade près du haut et du bas. Insérez et serrez les
vis de 2½".
Outils nécessaires:
• Mètre à ruban
• Recherche de
goujons
• Niveau
• Crayon
• Pinces
• Carré
• Percer avec un foret
de 3∕32"
• Tournevis
cruciforme et foret
Les matériaux nécessaires:
• Cales en bois
• Vis à bois à tête ronde ou à tête plate de 2½po
• Vis à bois à tête ronde de 2½"
800022 / A5170 - Rev 0
Tall Cabinet Installation Instructions
CAUTION: Never use nails to mount cabinets. The use of nails may void your factory warranty, written or implied.
Before starting the installation
These instructions are intended as supplemental reference for those who have the appropriate skills and experience to safely and
successfully install cabinetry, including familiarity with basic carpentry principles and safe and proper tool use. Wall framing and construction
can vary greatly, and these instructions may not describe all construction methods. Also, there may be electric, plumbing, gas lines or other
utilities behind the wall, for which contact must be avoided during installation. If for any reason after reading these instructions you do not
feel condent in the ability to safely and successfully install this cabinetry, please contact a licensed contractor for installation. MasterBrand
Cabinets is not responsible for improper installation or property damage.
WARNING: Electric, plumbing, gas lines and other utilities, are frequently installed or embedded behind walls where cabinets are being installed. Before
drilling any holes or driving any screws, be sure you will not be making contact with any of these utilities. Failure to follow these instructions may result in
property damage and serious or fatal injury. If you do not feel condent in your ability to insure that you will not make contact with utilities behind a wall
during installation, please contact a licensed contractor to install the cabinets.
Step 1: Inspect New Cabinets
All cabinets are subjected to quality inspections before leaving the factory, and have been carefully packaged to prevent damage during
shipping and handling. Unfortunately, damage may occur occasionally in handling between the factory and the nal destination. Inspect
each cabinet carefully. If damage is discovered, place the cabinet back into the carton and notify retailer of purchase.
Step 2: Determine Cabinet Placement
Remove baseboard and other objects on the wall area where the cabinets are to be installed. Using a
straight edge and a level, nd the high point in the oor where the cabinets are to be installed. From the high
point, mark a level horizontal line on each wall where the cabinets will be attached. From the level lines, mark
another parallel level horizontal line 84” for the tall cabinet heights. The top of the base, tall & wall cabinets
will be located at these marks.
Step 3: Prepare For Cabinet Installation
Locate the studs with a stud nder and mark where the cabinets are to be installed. Remove all the doors,
drawers and adjustable shelving from the cabinets before installation. This will reduce weight and allow
easier access during installation.
Step 4: Begin Cabinet Installation
Start installing the base cabinets in the corner (if applicable). Follow the base cabinet instructions and work
towards the tall cabinet unit. Using clamps, align and join the adjacent cabinets together at the face frames.
Make sure that the face frames align both on the face and vertically. With a
3
∕
32
” drill bit, drill starter holes
through the face frames near the top and bottom. Insert and tighten the 2½” screws.
Shim
Shim
Shim
2"
Min.
Use level to
draw line
Floor not
level
High point
Level
54″
35″
84″
54″
35″
Stud marks
84″
Tools Needed:
• Tape Measure
• Stud Finder
• Level
• Pencil
• Clamps
• Square
Materials Needed:
• Wood Shims
• 2½” Trim Head or Flat Head Wood Screws
• 2½” Round Washer Head Wood Screws
• Drill with
3
∕
32
” Bit
• Phillips Head Screwdriver
and drill driver bit
Utilisez le niveau
pour tracer une
ligne
Point haut
Sol pas de
niveau
Niveau
Marques de goujons